第七章
7.5节 : 通用套接字选项, 常用的有
- SO_KEEPALIVE
- SO_REVBUF
- SO_SNDBUF
- SO_REUSEADDR
7.9节 : tcp套接字选项, 常用的有
- TCP_NODELAY
- TCP_MAXSEG
- 7.11节 :fcntl函数,常用的用法是使用F_SETFL命令设置O_NOBLOCK文件状态标志, 我们可以把一个套接字设置为非阻塞型。
. . .
因为第二章之后基本都是纯Socket API的内容, 第三章到第十一章的笔记整理合并到一起。
3.4 :字节排序函数,涉及到大小端,处理网络字节序和主机字节序的转换
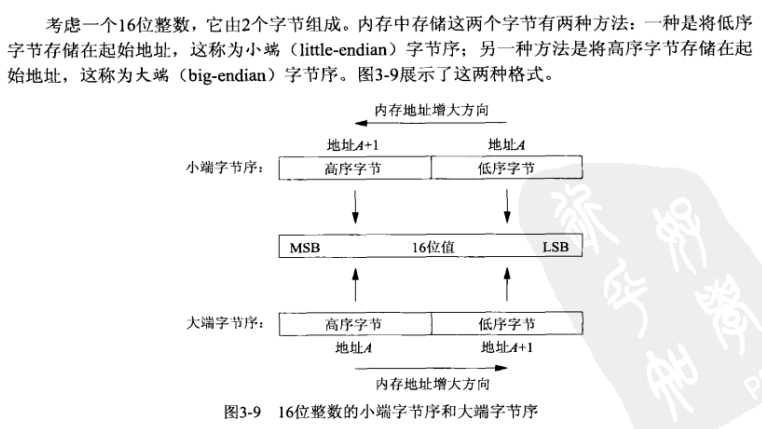
如何判别是大端(Big-Endian)还是小端(Little-Endian):
union TestBigOrLittle |
网际协议使用大端字节序来传送这些多字节整数, 也就是说网络字节序就是大端字节序.
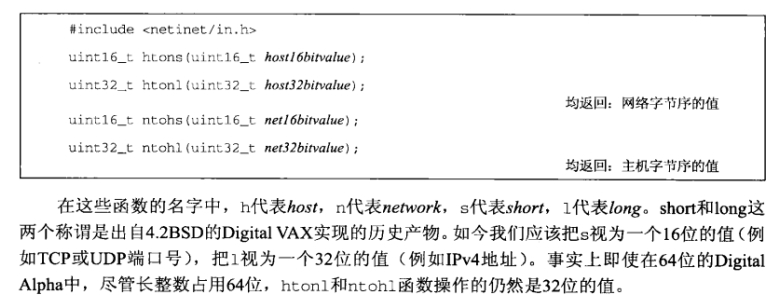
由图中我们可以知道, htons和ntohs是用于端口的字节序转换的, 而htonl和ntohl是用于32位IP地址的, 下图就是一个例子:

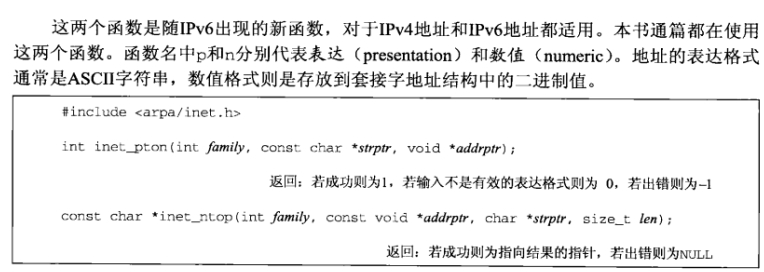
3.6 : 地址转换函数,它们在ASCII字符串(这是人们偏爱使用的格式)与网络字节序的二进制值(这是存放在套接字地址结构中的值)之间转换网际地址
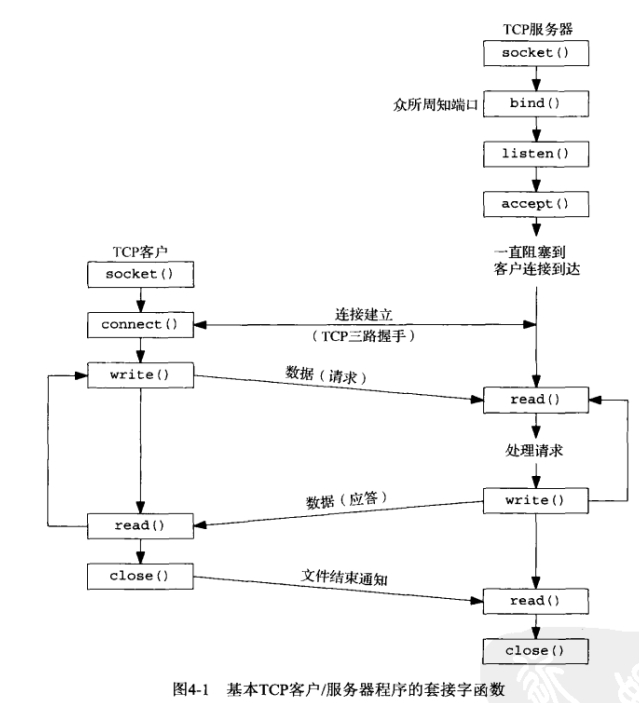

listen函数
int listen(int sockfd, int backlog);
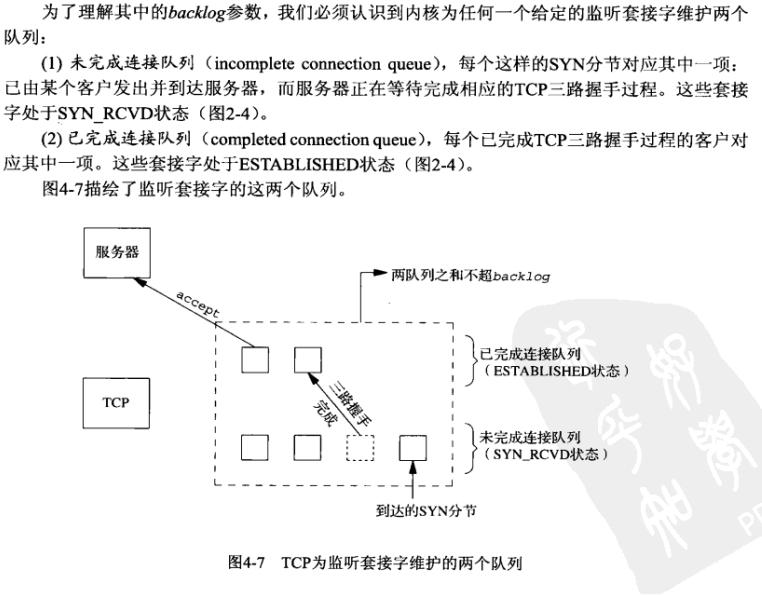
当来自客户的SYN到达时,TCP在未完成连接队列中创建个新项,然后响应以三路握手
的第—个分节服务器的SYN响应,其中捎带对客户SYN的ACK(2.6节)。这一项.直保留在
未完成连接队列中,直到三路握手的第二个分节(客户对服务器SYN的ACK)到达或者该项超
时为止。(源白Berkeley的实现为这些末完成连接的项设置的超时值为75s。)如果3路握手正常
完成,该项就从未完成连接队列移到已完成连接队列的队尾。当进程调用accept时(该函数在
下一节讲解),己完成连接队列巾的队头项将返回给给进程,或者如果该队列为空,那么进程将被
投入睡眠,直到TCP在该队列中放入一项才唤醒它。
4.6节: accept函数
accept函数用于从已完成连接队列对头返回下一个已完成连接
int accept(int sockfd, struct sockaddr *cliaddr, socklent_t *addrlen);
4.7节: fork函数
fork函数的内存语义:
. . .
为加深理解, 故本章老笔记内容大幅删减重写.
第二章重点如下 :
特性如下 :
特性如下 :

. . .
又准备从头看一遍unp, 把一些老笔记放到博客里来就当网盘吧, 顺便修正以及删减一些之前不够精炼的老笔记内容.
第一章重点如下 :
. . .
当你点击 .uproject 文件却打不开项目, 弹出一个窗口写着 “Failed TO Launch Editor”的时候,
大概率是因为你对 UE4Editor.exe 设置为了以管理员身份打开,
所以解决方法就是 :
只要对 UE4Editor.exe 右键-属性-兼容性, 去掉”以管理员身份运行此程序”的勾
以及去掉”更改所有用户的设置”中的以管理员身份运行此程序的√
 iker 同学