参考链接
real questions
- What version of Spring Boot are you using?
- I currently use Spring Boot 2.7 and have explored Spring Boot 3, which introduces Jakarta EE namespace migration and enhanced native image support. Version selection depends on compatibility with other frameworks and enterprise requirements.
- What are the major features/changes in Spring Boot 3?
- Spring Boot 3 is built on Spring Framework 6 and supports Jakarta EE 10, native image compilation with GraalVM, and new observability APIs. It also drops support for Java 8 and 11.
- What is JPA? What are its parts?
- JPA is a Java standard for ORM (object-relational mapping). It uses annotations like @Entity, @Id, and supports CRUD via JpaRepository.
- Can we have default/static methods in functional interfaces?
- Yes, functional interfaces can have default or static methods. As long as there’s only one abstract method, they remain valid for lambda usage.
- Why can’t we use primitives in HashMap?
- Java collections like HashMap only accept objects as keys and values. Primitives must be boxed into wrapper classes like Integer using autoboxing.
Spring Restful API真题
write a rest controller
package com.java.interview.controller; |
write a @Transactional example
Create a service class and use the @Transactional annotation to demonstrate how this annotation manages all transactions within the service class.
import org.springframework.stereotype.Service; |
@Transactional 是 Spring 框架里用于管理事务的一个注解,在企业级 Java 开发中被广泛使用。事务是一组不可分割的数据库操作序列,这些操作要么全部成功,要么全部失败。@Transactional 注解能够让开发者以声明式的方式来管理事务,而非采用编程式的事务管理,这样能使代码更加简洁、易于维护。
主要作用
- 事务边界界定:借助该注解,能够清晰地划定一个方法或者类里的事务边界。当方法被调用时,事务会自动开启;方法执行完毕后,若没有异常,事务就会自动提交;若出现异常,事务则会自动回滚。
- 事务属性配置:可以通过设置注解的属性来对事务的隔离级别、传播行为、超时时间、只读状态等进行配置。
常用属性
- propagation:规定事务的传播行为,也就是当一个事务方法被另一个事务方法调用时,事务该如何进行传播。常见的传播行为有
Propagation.REQUIRED(默认值,若当前存在事务则加入,不存在则创建新事务)、Propagation.REQUIRES_NEW(始终创建新事务)等。 - isolation:设置事务的隔离级别,用来控制事务之间的可见性和并发访问。常见的隔离级别有
Isolation.DEFAULT(使用数据库默认隔离级别)、Isolation.READ_COMMITTED(读已提交)等。 - timeout:设置事务的超时时间,单位为秒。若事务在指定时间内未完成,就会自动回滚。
- readOnly:表明事务是否为只读事务。若设置为
true,则表示该事务仅用于读取数据,不进行写操作,数据库能够进行一些优化。 - rollbackFor:指定哪些异常会导致事务回滚。
- noRollbackFor:指定哪些异常不会导致事务回滚。
示例代码
以下是使用 @Transactional 注解的简单示例:import org.springframework.stereotype.Service;
import org.springframework.transaction.annotation.Transactional;
public class UserService {
(propagation = Propagation.REQUIRED, isolation = Isolation.READ_COMMITTED, timeout = 30, readOnly = false)
public void transferMoney(long fromUserId, long toUserId, double amount) {
// 实现转账逻辑
// 例如,从 fromUserId 的账户扣除金额
// 向 toUserId 的账户增加金额
}
}
在这个示例中,transferMoney 方法被 @Transactional 注解修饰,意味着该方法在执行时会开启一个事务。若在方法执行过程中出现异常,事务会自动回滚,保证数据的一致性。
在使用 @Transactional 注解时,如果不指定 rollbackFor 属性,事务的回滚行为将遵循默认规则,具体表现如下:
默认回滚规则
Spring 框架中 @Transactional 注解默认只会对未检查异常(RuntimeException 及其子类)和错误(Error)进行事务回滚,而对于已检查异常(继承自 Exception 但不是 RuntimeException 的异常)默认不会触发事务回滚。
示例说明
以下是一个简单的 Java 示例,帮助你理解这种默认行为:
import org.springframework.stereotype.Service; |
在上述代码中,exampleMethod 方法被 @Transactional 注解修饰,但没有指定 rollbackFor 属性。当方法抛出 FileNotFoundException(这是一个已检查异常)时,由于默认规则,事务不会回滚。
指定 rollbackFor 的情况
若你希望对特定的已检查异常也进行事务回滚,就需要明确指定 rollbackFor 属性。例如:
import org.springframework.stereotype.Service; |
在这个修改后的示例中,通过指定 rollbackFor = FileNotFoundException.class,当 exampleMethod 方法抛出 FileNotFoundException 时,事务会回滚。
总结
不指定 rollbackFor 属性时,事务只会对未检查异常和错误进行回滚。若你需要对特定的已检查异常也进行回滚,就需要明确指定 rollbackFor 属性。
在 Spring 框架里,拦截器(Interceptor)是一种可以在请求处理前后执行特定逻辑的组件。它的功能强大,常用于日志记录、权限验证、性能监控等场景。下面为你详细介绍 Spring 拦截器,并给出一个使用示例。
Spring interceptor拦截器
实现原理
Spring 拦截器主要通过实现 HandlerInterceptor 接口或者继承 HandlerInterceptorAdapter 类(在 Spring 5.3 之后被弃用)来实现。HandlerInterceptor 接口包含以下三个重要方法:
preHandle:在请求处理之前执行,可用于进行权限验证、日志记录等操作。若返回true,则继续执行后续的处理流程;若返回false,则中断请求处理。postHandle:在请求处理完成后、视图渲染之前执行,可用于对模型数据进行处理或者修改响应头。afterCompletion:在整个请求处理完成后执行,包括视图渲染完成,常用于资源清理等操作。
示例代码
下面是一个完整的 Spring 拦截器示例,包含拦截器的实现、配置以及使用:
1. 实现拦截器
创建一个类实现 HandlerInterceptor 接口,并重写其方法。import javax.servlet.http.HttpServletRequest;
import javax.servlet.http.HttpServletResponse;
import org.springframework.web.servlet.HandlerInterceptor;
import org.springframework.web.servlet.ModelAndView;
public class CustomInterceptor implements HandlerInterceptor {
public boolean preHandle(HttpServletRequest request, HttpServletResponse response, Object handler)
throws Exception {
System.out.println("请求处理前执行,URL: " + request.getRequestURL());
// 返回 true 继续执行后续处理流程
return true;
}
public void postHandle(HttpServletRequest request, HttpServletResponse response, Object handler,
ModelAndView modelAndView) throws Exception {
System.out.println("请求处理完成,视图渲染前执行");
}
public void afterCompletion(HttpServletRequest request, HttpServletResponse response, Object handler, Exception ex)
throws Exception {
System.out.println("整个请求处理完成后执行");
}
}
2. 配置拦截器
创建一个配置类,实现 WebMvcConfigurer 接口,并重写 addInterceptors 方法来注册拦截器。import org.springframework.context.annotation.Configuration;
import org.springframework.web.servlet.config.annotation.InterceptorRegistry;
import org.springframework.web.servlet.config.annotation.WebMvcConfigurer;
public class WebConfig implements WebMvcConfigurer {
public void addInterceptors(InterceptorRegistry registry) {
registry.addInterceptor(new CustomInterceptor())
// 拦截所有请求
.addPathPatterns("/**");
}
}
3. 创建控制器
创建一个简单的控制器来处理请求。import org.springframework.web.bind.annotation.GetMapping;
import org.springframework.web.bind.annotation.RestController;
public class HelloController {
("/hello")
public String hello() {
return "Hello, World!";
}
}
代码解释
CustomInterceptor:实现了HandlerInterceptor接口,在preHandle方法中打印请求 URL,在postHandle方法中表明请求处理完成,在afterCompletion方法中表示整个请求处理结束。WebConfig:实现了WebMvcConfigurer接口,通过addInterceptors方法将CustomInterceptor注册到拦截器链中,并指定拦截所有请求。HelloController:一个简单的控制器,处理/hello请求并返回 “Hello, World!”。
运行示例
当你启动 Spring 应用程序并访问 /hello 接口时,控制台会输出以下信息:请求处理前执行,URL: http://localhost:8080/hello
请求处理完成,视图渲染前执行
整个请求处理完成后执行
这表明拦截器的三个方法按顺序执行,验证了拦截器的功能。
Spring Annotations
Spring has numerous annotations. For example, @Component is used to mark ordinary POJO classes as components, allowing Spring to automatically scan and manage them. @Service is typically used to mark classes in the service layer, and @Repository is used for classes in the data access layer. Essentially, they are specialized forms of @Component with more specific semantics. @Autowired is used for automatic bean wiring, and @RequestMapping is used to handle request mappings and so on.
@Controller vs @RestController
@Controller is an annotation in Spring MVC used to mark controller classes. It usually works with view technologies such as JSP and is used to return views. @RestController, on the other hand, is a combination of @Controller and @ResponseBody. It means that the methods in this controller class will by default return the return value directly to the client as the response body. It is suitable for building RESTful APIs, and the returned data is usually in formats such as JSON or XML.
In Spring MVC, the difference between @Controller and @RestController mainly lies in how they handle responses:
- • @Controller is used to return views (HTML, JSP, etc.), making it suitable for traditional web applications.
- • @RestController is used to return JSON or XML data, making it ideal for RESTful APIs.
1. @Controller Example (Returning a View)
By default, @Controller returns a view name. To return JSON, you must use @ResponseBody.
|
📌 Explanation
- • The return “helloPage”; statement does not return JSON. Instead, it looks for a helloPage.html or helloPage.jsp view.
- • To return JSON from @Controller, you must explicitly add @ResponseBody:
|
2. @RestController Example (Returning JSON)
@RestController returns JSON by default, without requiring @ResponseBody.
public class MyRestController {
("/api/hello")
public Map<String, String> helloJson() {
Map<String, String> response = new HashMap<>();
response.put("message", "Hello, JSON!");
return response; // Automatically converted to JSON
}
}
📌 Explanation
- • @RestController is a combination of @Controller and @ResponseBody, so there’s no need to add @ResponseBody manually.
- • Spring Boot automatically converts the Map
{
“message”: “Hello, JSON!”
}
3. When to Use @Controller vs @RestController?
✅ Use @Controller 👉 If your application needs to return HTML pages (traditional MVC web apps).
✅ Use @RestController 👉 If you’re building a REST API that returns JSON data.
In short:
- • If your app is frontend-backend separated (React, Vue, Angular consuming JSON), use @RestController.
- • If your app renders views on the server and serves HTML pages, use @Controller.
🚀 If you’re unsure, prefer @RestController—it aligns with modern web development practices!
- @Qualifier, @Primary
@Qualifieris used to specify the name or qualification conditions of the specific bean to be wired during autowiring. When there are multiple beans of the same type,@Qualifiercan be used to clearly specify which one to use.@Primaryis used to mark a bean as the preferred candidate for autowiring. When there are multiple beans of the same type, Spring will preferentially select the bean marked with@Primaryfor autowiring. - Spring Cache and Retry
Spring Cache provides declarative cache support. Annotations like@Cacheable,@CachePut, and@CacheEvictcan be easily used to cache the results of methods, improving system performance and reducing database access. Spring Retry, on the other hand, offers a mechanism to automatically retry operations that fail due to certain conditions, such as network failures or temporary database unavailability. It can be configured through annotations and configuration classes to specify retry policies, including the number of retries, retry intervals, and conditions for triggering retries.
Spring
- How to create spring boot from Scratch
To create a Spring Boot project from scratch, you can start by choosing a build tool like Maven or Gradle. Then, create a basic project structure with directories for source code, resources, etc. Add the necessary Spring Boot dependencies to the build configuration file. Define the main application class, which is usually annotated with@SpringBootApplication. You can then start adding controllers, services, and other components as needed to build your application. - Benefit of Spring boot
Spring Boot simplifies the development of Spring applications. It provides auto-configuration, which reduces the need for extensive XML or Java configuration. It also comes with a built-in embedded server, making it easy to run and deploy applications. Spring Boot starters allow for quick addition of common dependencies and functionality. Additionally, it offers features like actuator endpoints for monitoring and managing the application, and it makes it easier to handle configuration properties and profiles. - Annotation @SpringBootApplication
@SpringBootApplicationis a composite annotation that combines@SpringBootConfiguration,@EnableAutoConfiguration, and@ComponentScan. It is used to mark the main application class and tells Spring Boot to start the application, perform auto-configuration, and scan for components in the specified packages and their sub-packages. - AutoConfiguration, how to disable
Spring Boot’s auto-configuration automatically configures beans based on the dependencies present in the project. To disable specific auto-configurations, you can use the@SpringBootApplication(exclude = {SomeAutoConfiguration.class})annotation at the application level. You can also set properties in theapplication.propertiesorapplication.ymlfile to disable certain auto-configurations, for example,spring.autoconfigure.exclude=com.example.SomeAutoConfiguration. Actuator
Spring Boot Actuator provides endpoints that allow you to monitor and manage your application. It offers endpoints such as/healthto check the health of the application,/metricsto view various metrics about the application’s performance,/infoto get information about the application, and many others. These endpoints can be used for debugging, monitoring, and optimizing the application.Spring AciveProfile
SpringActiveProfileallows you to define different profiles for your application, such asdev,test,prod, etc. You can configure different beans, properties, and behaviors for each profile. By setting thespring.profiles.activeproperty, you can switch between different profiles at runtime, enabling different configurations for different environments.- @ExceptionHandler, @ControllerAdvice
@ExceptionHandleris used in a controller class to handle specific exceptions that occur within the methods of that controller.@ControllerAdviceis a global exception handling mechanism. It allows you to define a class that can handle exceptions across multiple controllers. You can use@ExceptionHandlerwithin a@ControllerAdviceclass to handle different types of exceptions globally and return appropriate error responses to the client.
In Java and Spring framework, Dependency Injection (DI) is a design pattern that allows objects to receive dependencies from external sources rather than creating them internally. There are several ways to implement DI, and here are the common ones:
Different ways of DI
1. Constructor Injection
- Principle: Dependencies are passed to the object through its constructor. This is the most recommended way as it enforces the immutability of dependencies and makes the object fully initialized when it is created.
- Example:
In this example, the Car class depends on the Engine class, and the Engine instance is passed through the Car constructor.
2. Setter Injection
- Principle: Dependencies are set through setter methods of the object. This allows for optional dependencies and the ability to change dependencies after the object is created.
- Example:
Here, the Document class has a setPrinter method to set the Printer dependency.
3. Interface Injection
- Principle: A class implements an interface that defines a method to inject the dependency. This approach is less common in practice compared to constructor and setter injection.
- Example:
In this example, the Client class implements the ServiceInjector interface to receive the Service dependency.
4. Field Injection
- Principle: Dependencies are directly injected into the fields of a class using annotations (commonly used in Spring framework). It is simple but has some drawbacks like making the class harder to test in isolation.
- Example:
In this example, the Database dependency is injected directly into the Application class field using a custom @Autowired-like annotation.
Comparison
| Injection Method | Advantages | Disadvantages |
|---|---|---|
| Constructor Injection | Enforces immutability, makes dependencies clear, object is fully initialized on creation | Not suitable for optional dependencies |
| Setter Injection | Allows for optional dependencies, can change dependencies after creation | Object may be in an inconsistent state if dependencies are not set |
| Interface Injection | Provides a clear contract for dependency injection | More complex and less commonly used |
| Field Injection | Simple and concise | Harder to test in isolation, object may be in an inconsistent state |
how to solve Circular Dependency
Circular dependency occurs when two or more components depend on each other either directly or indirectly. This can cause issues such as infinite loops during the creation process and make the codebase hard to understand and maintain. Here are some common ways to solve circular dependencies in different programming contexts, with a focus on Java and Spring framework:
2. Use Setter Injection Instead of Constructor Injection
- Principle: Constructor injection enforces that all dependencies are provided at the time of object creation. By using setter injection, we can create the objects first and then set the dependencies later, breaking the circular creation loop.
- Example in Spring:
import org.springframework.beans.factory.annotation.Autowired;
import org.springframework.stereotype.Component;
class A {
private B b;
public void setB(B b) {
this.b = b;
}
}
class B {
private A a;
public void setA(A a) {
this.a = a;
}
}
In Spring, the container can create the A and B objects first and then use the setter methods to inject the dependencies.
3. Use a Factory Pattern
- Principle: A factory class can be used to create objects and manage their dependencies. This way, the objects can be created without immediately resolving all the dependencies.
- Example:
class Factory {
    private static A a;
    private static B b;

    public static A getA() {
        if (a == null) {
            a = new A();
            if (b == null) {
                b = new B();
            }
            a.setB(b);
        }
        return a;
    }

    public static B getB() {
        if (b == null) {
            b = new B();
            if (a == null) {
                a = new A();
            }
            b.setA(a);
        }
        return b;
    }
}

class A {
    private B b;

    public void setB(B b) {
        this.b = b;
    }
}

class B {
    private A a;

    public void setA(A a) {
        this.a = a;
    }
}
The Factory class ensures that the objects are created and their dependencies are set in a controlled way.
4. Use Lazy Initialization
- Principle: Instead of initializing the dependencies immediately, delay the initialization until they are actually needed. In Spring, this can be achieved using the
@Lazyannotation. - Example in Spring:
import org.springframework.beans.factory.annotation.Autowired;
import org.springframework.context.annotation.Lazy;
import org.springframework.stereotype.Component;
class A {
private final B b;
public A(@Lazy B b) {
this.b = b;
}
}
class B {
private final A a;
public B(@Lazy A a) {
this.a = a;
}
}
The @Lazy annotation tells Spring to create the bean only when it is first accessed, which can break the circular creation loop.
scope有哪些类型
1. Spring 中 scope 的类型
在 Spring 框架里,scope 定义了 Spring 容器如何创建和管理 Bean 的实例。以下是 Spring 中常见的 scope 类型:
(1)singleton(单例)
- 描述:这是 Spring 里默认的
scope类型。当一个 Bean 被定义为单例时,在整个 Spring 容器的生命周期中,只会创建该 Bean 的一个实例。所有对这个 Bean 的请求都会返回同一个实例。 - 示例配置:
<bean id="mySingletonBean" class="com.example.MyBean" scope="singleton"/>
或者使用注解:import org.springframework.context.annotation.Scope;
import org.springframework.stereotype.Component;
("singleton")
public class MyBean {
// 类的内容
}
(2)prototype(原型)
- 描述:每次请求该 Bean 时,Spring 容器都会创建一个新的实例。也就是说,对
prototype作用域的 Bean 进行多次请求,会得到不同的实例。 - 示例配置:
<bean id="myPrototypeBean" class="com.example.MyBean" scope="prototype"/>
或者使用注解:import org.springframework.context.annotation.Scope;
import org.springframework.stereotype.Component;
("prototype")
public class MyBean {
// 类的内容
}
(3)request(请求)
- 描述:仅适用于基于 Web 的 Spring 应用。在一次 HTTP 请求的生命周期内,容器会创建并返回同一个 Bean 实例。不同的 HTTP 请求会得到不同的实例。
- 示例配置:
<bean id="myRequestBean" class="com.example.MyBean" scope="request"/>
或者使用注解:import org.springframework.context.annotation.Scope;
import org.springframework.stereotype.Component;
import org.springframework.web.context.WebApplicationContext;
(WebApplicationContext.SCOPE_REQUEST)
public class MyBean {
// 类的内容
}
(4)session(会话)
- 描述:同样适用于基于 Web 的 Spring 应用。在一个用户会话的生命周期内,容器会创建并返回同一个 Bean 实例。不同的用户会话会得到不同的实例。
- 示例配置:
<bean id="mySessionBean" class="com.example.MyBean" scope="session"/>
或者使用注解:import org.springframework.context.annotation.Scope;
import org.springframework.stereotype.Component;
import org.springframework.web.context.WebApplicationContext;
(WebApplicationContext.SCOPE_SESSION)
public class MyBean {
// 类的内容
}
(5)application(应用)
- 描述:适用于基于 Web 的 Spring 应用。在整个 Web 应用的生命周期内,容器会创建并返回同一个 Bean 实例。
- 示例配置:
<bean id="myApplicationBean" class="com.example.MyBean" scope="application"/>
或者使用注解:import org.springframework.context.annotation.Scope;
import org.springframework.stereotype.Component;
import org.springframework.web.context.WebApplicationContext;
(WebApplicationContext.SCOPE_APPLICATION)
public class MyBean {
// 类的内容
}
(6)websocket(WebSocket)
- 描述:在 Spring 4.2 及以后版本引入,用于 WebSocket 相关的应用。在一个 WebSocket 会话的生命周期内,容器会创建并返回同一个 Bean 实例。
- 示例配置:
import org.springframework.context.annotation.Scope;
import org.springframework.stereotype.Component;
import org.springframework.web.socket.config.annotation.WebSocketScopeMetadataResolver;
(WebSocketScopeMetadataResolver.SCOPE_WEBSOCKET)
public class MyBean {
// 类的内容
}
2. 将 prototype Bean 注入到 singleton Bean 中会发生什么
当把一个 prototype 作用域的 Bean 注入到 singleton 作用域的 Bean 中时,需要注意以下情况:
(1)默认行为
在默认情况下,singleton Bean 在创建时会获取 prototype Bean 的一个实例,并且在 singleton Bean 的整个生命周期中都使用这个实例。这意味着,尽管 prototype 作用域的设计初衷是每次请求都创建新实例,但由于 singleton Bean 只创建一次,它只会在创建时获取一次 prototype Bean 的实例,后续不会再获取新的 prototype Bean 实例。
(2)示例代码
|
result:PrototypeBean 实例创建,计数器: 1
PrototypeBean 实例创建,计数器: 1
是同一个 prototypeBean 实例
(3)代码解释
在上述代码中,PrototypeBean 是 prototype 作用域的 Bean,SingletonBean 是 singleton 作用域的 Bean,并且 SingletonBean 注入了 PrototypeBean。运行代码会发现,singletonBean1 和 singletonBean2 中注入的是同一个 PrototypeBean 实例,因为 SingletonBean 在创建时只获取了一次 PrototypeBean 实例,后续不会再获取新的实例。
(4)解决方案
如果想要每次使用 prototype Bean 时都获取一个新的实例,可以使用 ObjectFactory 或者 Provider 来实现。例如:class SingletonBean {
// @Autowired
// private PrototypeBean prototypeBean;
//
// public PrototypeBean getPrototypeBean() {
// return prototypeBean;
// }
private ObjectFactory<PrototypeBean> prototypeBeanFactory;
public PrototypeBean getPrototypeBean() {
return prototypeBeanFactory.getObject();
}
}
result:PrototypeBean 实例创建,计数器: 1
PrototypeBean 实例创建,计数器: 1
不是同一个 prototypeBean 实例
在这个改进后的代码中,SingletonBean 通过 ObjectFactory 来获取 PrototypeBean 实例,每次调用 getObject() 方法时都会得到一个新的 PrototypeBean 实例。
AOP
AOP(Aspect-Oriented Programming)即面向切面编程,是一种编程范式,它允许开发者在不修改原有业务逻辑的基础上,对程序进行增强,比如添加日志记录、事务管理、权限验证等功能。在 Java 中,Spring AOP 是实现 AOP 编程的常用框架,下面为你详细介绍 AOP 的相关概念,并给出示例代码。
相关概念
- 切面(Aspect):封装了横切关注点的类,包含了多个通知和切点。
- 通知(Advice):定义了在何时执行何种操作,常见的通知类型有前置通知、后置通知、环绕通知、异常通知和最终通知。
- 切点(Pointcut):定义了在哪些连接点上应用通知,即确定哪些方法会被增强。
- 连接点(Join point):程序执行过程中可以插入切面的点,通常是方法调用。
示例代码
下面是一个使用 Spring AOP 实现日志记录的示例:
package com.example.aop; |
代码解释
- Main 类:这是程序的入口类,使用
AnnotationConfigApplicationContext来加载 Spring 配置,并获取UserService实例,调用addUser方法。 - UserService 类:这是一个简单的业务服务类,包含一个
addUser方法,用于添加用户。 - LoggingAspect 类:这是一个切面类,包含以下内容:
@Pointcut注解定义了一个切点,匹配com.example.aop.UserService类中的所有方法。@Before注解定义了一个前置通知,在目标方法执行之前执行,输出方法名。@After注解定义了一个后置通知,在目标方法执行之后执行,输出方法名。
运行结果
运行上述代码,输出结果如下:Before method: addUser
Adding user: John
After method: addUser
通过这个示例,你可以看到 AOP 如何在不修改 UserService 类原有业务逻辑的基础上,添加了日志记录功能。
在 Spring 框架里,@ExceptionHandler 和 @ControllerAdvice 属于重要的注解,它们主要用于处理控制器层面的异常。下面分别介绍它们的用法:
怎么处理Controller的异常
@ExceptionHandler
@ExceptionHandler 注解能够在控制器类中定义异常处理方法,这样当控制器方法抛出指定类型的异常时,就会调用这些处理方法。
示例代码
import org.springframework.web.bind.annotation.ExceptionHandler; |
代码解释
@RequestMapping("/test")方法在被调用时会抛出RuntimeException。@ExceptionHandler(RuntimeException.class)注解的handleRuntimeException方法会处理RuntimeException类型的异常,并且返回包含异常信息的字符串。
@ControllerAdvice
@ControllerAdvice 注解可用于定义全局的异常处理类,这个类里的 @ExceptionHandler 方法能处理所有控制器抛出的异常。
示例代码
import org.springframework.http.HttpStatus; |
代码解释
@RestControllerAdvice表明这是一个全局的异常处理类。@ExceptionHandler(RuntimeException.class)注解的handleRuntimeException方法会处理所有控制器抛出的RuntimeException类型的异常。@ResponseStatus(HttpStatus.INTERNAL_SERVER_ERROR)把响应状态码设为 500。
结合使用
通常会把 @ExceptionHandler 和 @ControllerAdvice 结合起来使用,以此实现全局的异常处理。
示例代码
import org.springframework.http.HttpStatus; |
代码解释
@RestControllerAdvice注解的GlobalExceptionHandler类是全局异常处理类。@ExceptionHandler(Exception.class)注解的handleException方法会处理所有控制器抛出的Exception类型的异常。@ResponseStatus(HttpStatus.INTERNAL_SERVER_ERROR)把响应状态码设为 500。
通过上述的介绍,你可以在 Spring 应用中运用 @ExceptionHandler 和 @ControllerAdvice 注解来处理异常,从而提升应用的健壮性与用户体验。
spring 的bean是啥意思
在 Spring 框架中,“Bean” 是一个核心概念,它是被 Spring 容器管理的对象。下面从多个方面详细解释 Spring 的 Bean 是什么:
定义与本质
在 Spring 里,Bean 本质上就是由 Spring 容器实例化、组装和管理的普通 Java 对象。这些对象的生命周期(创建、初始化、使用和销毁)都由 Spring 容器来控制,而不是由程序员在代码中手动创建和管理。例如,在传统 Java 开发中,我们会使用 new 关键字来创建对象:UserService userService = new UserServiceImpl();
但在 Spring 框架中,Spring 容器会负责创建 UserService 对象,我们只需要从容器中获取这个对象即可使用。
Bean 的创建方式
Spring 容器创建 Bean 有多种方式,常见的有以下几种:
- 基于 XML 配置:在 Spring 的 XML 配置文件中,可以使用
<bean>标签来定义 Bean。示例如下:<bean id="userService" class="com.example.service.UserServiceImpl"/>
这里的 id 是 Bean 的唯一标识符,class 是 Bean 对应的 Java 类的全限定名。Spring 容器会根据这个配置信息创建 UserServiceImpl 类的实例。
- 基于注解:使用 Spring 的注解可以更方便地定义 Bean。例如,使用
@Component、@Service、@Repository和@Controller等注解。示例如下:import org.springframework.stereotype.Service;
public class UserServiceImpl implements UserService {
// 类的具体实现
}
@Service 注解表示这是一个服务层的 Bean,Spring 会自动扫描带有这些注解的类,并将它们注册为 Bean。
- 基于 Java 配置类:使用 Java 配置类和
@Bean注解来定义 Bean。示例如下:import org.springframework.context.annotation.Bean;
import org.springframework.context.annotation.Configuration;
public class AppConfig {
public UserService userService() {
return new UserServiceImpl();
}
}
@Configuration 注解表示这是一个配置类,@Bean 注解用于定义一个 Bean,方法名 userService 就是 Bean 的名称。
Bean 的生命周期
Spring 容器管理的 Bean 有其完整的生命周期,主要包括以下几个阶段:
- 实例化:Spring 容器根据配置信息创建 Bean 的实例。
- 属性注入:如果 Bean 有依赖的属性,Spring 容器会将这些依赖注入到 Bean 中。
- 初始化:在 Bean 实例创建并完成属性注入后,Spring 容器会调用 Bean 的初始化方法(如果有定义),可以通过实现
InitializingBean接口的afterPropertiesSet()方法或使用@PostConstruct注解来定义初始化逻辑。 - 使用:Bean 初始化完成后,就可以被应用程序使用了。
- 销毁:当 Spring 容器关闭时,会调用 Bean 的销毁方法(如果有定义),可以通过实现
DisposableBean接口的destroy()方法或使用@PreDestroy注解来定义销毁逻辑。
Bean 的作用域
Spring 支持多种 Bean 的作用域,常见的有以下几种:
- 单例(Singleton):默认的作用域,Spring 容器只会创建一个 Bean 实例,所有对该 Bean 的请求都会返回同一个实例。
- 原型(Prototype):每次请求该 Bean 时,Spring 容器都会创建一个新的实例。
- 请求(Request):在 Web 应用中,每个 HTTP 请求都会创建一个新的 Bean 实例。
- 会话(Session):在 Web 应用中,每个 HTTP 会话会创建一个新的 Bean 实例。
Bean 的意义和优势
- 解耦和可维护性:通过将对象的创建和管理交给 Spring 容器,降低了代码之间的耦合度,使得代码更易于维护和扩展。
- 依赖注入:方便实现依赖注入,提高了代码的可测试性和灵活性。
- 生命周期管理:Spring 容器对 Bean 的生命周期进行管理,确保 Bean 在合适的时机被创建、初始化和销毁。
spring core和springboot和spring jpa和spring rest和spring security 的区别
Spring Core、Spring Boot、Spring JPA、Spring REST 和 Spring Security 都是 Spring 生态系统中的重要组成部分,它们各自承担着不同的职责,下面为你详细介绍它们之间的区别:
Spring Core
- 核心地位:Spring Core 是整个 Spring 框架的基础,提供了最核心的功能,是其他 Spring 模块构建的基石。
- 主要功能
- IoC(控制反转)和 DI(依赖注入):通过 IoC 容器管理对象的创建和依赖关系,降低代码之间的耦合度。例如,使用
ApplicationContext来获取和管理 Bean 对象。 - AOP(面向切面编程):允许开发者在不修改原有业务逻辑的基础上,对程序进行增强,如日志记录、事务管理等。
- 资源管理:提供了统一的资源加载机制,方便处理文件、类路径资源等。
- IoC(控制反转)和 DI(依赖注入):通过 IoC 容器管理对象的创建和依赖关系,降低代码之间的耦合度。例如,使用
- 使用场景:是所有使用 Spring 框架的项目的基础,无论项目规模大小和类型如何,都离不开 Spring Core 提供的核心功能。
Spring Boot
- 开发理念:Spring Boot 的设计目标是简化 Spring 应用的开发过程,通过自动配置和约定大于配置的原则,减少开发者的配置工作量。
- 主要功能
- 自动配置:根据项目中引入的依赖,自动进行相关的配置。例如,引入 Spring Data JPA 和 MySQL 驱动后,Spring Boot 会自动配置数据源和 JPA 相关的 Bean。
- 嵌入式服务器:内置了 Tomcat、Jetty 等嵌入式服务器,无需手动部署到外部服务器,直接运行应用程序即可启动 Web 服务。
- Actuator:提供了应用程序的监控和管理功能,如健康检查、指标统计等。
- 使用场景:适合快速搭建 Spring 应用,尤其是微服务架构下的应用开发,能够大大提高开发效率。
Spring JPA
- 功能定位:Spring JPA(Java Persistence API)是 Spring 对 JPA 规范的集成和扩展,用于简化数据库访问层的开发。
- 主要功能
- 对象关系映射(ORM):通过注解或 XML 配置,将 Java 对象映射到数据库表,实现对象和数据库记录之间的转换。
- Repository 接口:提供了一系列的 Repository 接口,如
CrudRepository、JpaRepository等,开发者可以通过定义接口方法来实现常见的数据库操作,无需编写具体的 SQL 语句。 - 事务管理:支持声明式事务管理,通过注解(如
@Transactional)可以方便地管理数据库事务。
- 使用场景:适用于需要与关系型数据库进行交互的项目,能够减少数据库访问层的代码量,提高开发效率。
Spring REST
- 功能用途:Spring REST 主要用于构建 RESTful 风格的 Web 服务,遵循 REST(Representational State Transfer)架构风格。
- 主要功能
- 控制器注解:使用
@RestController和@RequestMapping等注解来定义 RESTful 接口,处理 HTTP 请求和响应。 - 数据绑定和序列化:自动将请求参数绑定到 Java 对象,并将 Java 对象序列化为 JSON 或 XML 格式的响应数据。
- HATEOAS(Hypermedia as the Engine of Application State):支持 HATEOAS 原则,在响应数据中包含链接信息,提高 API 的可发现性和可导航性。
- 控制器注解:使用
- 使用场景:适合构建前后端分离的 Web 应用,为前端提供数据接口,也可用于构建微服务架构中的服务之间的通信接口。
Spring Security
- 核心功能:Spring Security 是一个强大的身份验证和授权框架,用于保护 Spring 应用程序的安全性。
- 主要功能
- 身份验证:支持多种身份验证方式,如表单登录、HTTP 基本认证、OAuth2 等,验证用户的身份信息。
- 授权管理:可以基于角色、权限等对用户进行授权,控制用户对资源的访问权限。
- 防止攻击:提供了防止常见 Web 攻击的功能,如 CSRF(跨站请求伪造)、XSS(跨站脚本攻击)等。
- 使用场景:任何需要保护用户数据和资源安全的 Spring 应用都可以使用 Spring Security,尤其是涉及用户登录、敏感数据访问等场景。
总结
Spring Core 是 Spring 框架的核心基础,Spring Boot 简化了 Spring 应用的开发过程,Spring JPA 用于简化数据库访问,Spring REST 用于构建 RESTful 服务,Spring Security 用于保障应用程序的安全性。在实际项目中,通常会根据项目的需求综合使用这些模块。
the relationship between Servlet and TomCat
Servlet is a specification and technology in Java for developing web applications, while Tomcat is an open - source Servlet container. The relationship between them is as follows:
Specification and implementation relationship
- Servlet specification: Servlet is a set of standard specifications developed by Sun Microsystems (now Oracle). It defines how Servlet classes should be written and how to interact with client requests and servers. In simple terms, the Servlet specification is an abstract design that stipulates the interfaces and methods for handling requests and responses in web application development. For example, the Servlet specification defines the
javax.servlet.Servletinterface, and the Servlet classes written by developers need to implement this interface or inherit abstract classes such asHttpServlet. - Tomcat implementation: Tomcat is a specific implementation of the Servlet specification. It implements various interfaces and methods defined in the Servlet specification, enabling the code written by developers that conforms to the Servlet specification to run on the Tomcat server. Tomcat provides a running environment for Servlets, allowing them to handle client requests and return responses.
Running carrier relationship
- Servlet’s running dependency: A Servlet itself is just a piece of Java code and cannot run independently. It requires a running environment, namely a Servlet container. The Servlet code needs to be deployed in a Servlet container, which is responsible for loading, instantiating, and managing the lifecycle of the Servlet.
- Tomcat as the carrier: Tomcat is such a Servlet container that can provide a running environment for Servlets. After developers write a Servlet class, they package it into a WAR (Web Application Archive) file and deploy it to Tomcat. Tomcat will be responsible for loading these Servlet classes, creating Servlet instances, and calling their methods to handle client requests. For example, when a client sends an HTTP request to the Tomcat server, Tomcat will find the corresponding Servlet according to the URL of the request and call the
service()method of the Servlet for processing.
Interaction and collaboration relationship
- Request processing flow: A client (such as a browser) sends an HTTP request to the Tomcat server. After receiving the request, Tomcat finds the corresponding Servlet according to information such as the URL of the request. Then, Tomcat creates
ServletRequestandServletResponseobjects to encapsulate the client’s request information and response information respectively, and passes these two objects to the corresponding methods (such asdoGet()ordoPost()) of the Servlet. The Servlet processes the business logic according to the request information, generates the response content, and writes it into theServletResponseobject. Finally, Tomcat retrieves the response content from theServletResponseobject and returns it to the client. - Lifecycle management: Tomcat is responsible for managing the lifecycle of Servlets. After a Servlet is deployed to Tomcat, Tomcat will instantiate and initialize the Servlet (call the
init()method) at an appropriate time. When a request arrives, it calls the service method of the Servlet to handle the request. When Tomcat is shut down or the Servlet is unloaded, Tomcat will call thedestroy()method of the Servlet to release resources.
Development and deployment relationship
- Development aspect: When developers develop Servlets, they only need to write Java code following the Servlet specification to implement the corresponding business logic, without having to worry about how the Servlet runs on the server. They can use various Java development tools (such as Eclipse, IntelliJ IDEA, etc.) to write and debug Servlet code.
- Deployment aspect: After development, the Servlet code is packaged into a WAR file and then deployed to the Tomcat server. Tomcat will automatically decompress the WAR file, load the Servlet classes in it into memory, and make them capable of handling client requests. This separated development and deployment method allows developers to focus on the implementation of business logic, while server administrators are responsible for server configuration and management.
J2EE vs Spring
现在已经基本没人用J2EE了, 都是用spring.
如上所述,J2EE是一套标准,它对一系列接口进行了约定,然后由众多厂商围绕这个标准做实现。Spring框架就是一个开源的J2EE应用程序框架。(搞了半天,原来Spring也算是J2EE一分子)
早期的Spring定位于解决J2EE在实际使用上的一系列问题,因为J2EE的API实在是太难用了。Spring框架的发起人Rod估计是趟了不少大坑,于是总结了一套最佳实践,并总结到了一套框架里。其中最重要的,就是所谓IoC(控制反转)。
Spring大量使用或者实现了J2EE标准。比如spring-mvc是在servlet基础之上的封装;spring本身并不提供容器,而是支持使用任何支持servlet标准的容器(如tomcat,jetty等);spring-data也实现了JPA,通过标准接口对进行CRUD等。归根到底Spring只是想更好的解决实际问题。J2EE的实现做得好的就用,做得不好的,用比较恰当的方式独立实现或者封装。
随着时间的发展,J2EE已经越来越落后,这是由于它的体制造成的。J2EE的制定是由几大巨头定期开会协商通过,发布。然后由大容器实现厂商跟进。但这样太慢了。互联网的发展速度已经远不是这样一个僵化的体制能够适应的。反观Spring相对就快速的多。Spring自己就是一家公司,觉得整个社区什么东西最前沿,最急缺就立刻响应去做了。比如,Restful刚流行,你是愿意等一年半载出JAX-RS标准,然后再出Jersey,才能用;还是选择直接用Spring MVC直接就把事办了?结果不言而喻。对解决问题的态度是二者目前境遇不同的主要原因。最早期J2EE是领导者,所有的技术厂商要想在这个圈子里混,必须跟着标准走。而Spring逐渐占据领导地位之后,J2EE的一些标准反而要跟着Spring走。
作者:leftfist
链接:https://juejin.cn/post/6945982696183054349
来源:稀土掘金
著作权归作者所有。商业转载请联系作者获得授权,非商业转载请注明出处。
Spring JPA和MyBatis区别
现实里,中国大陆mybatis用的确实多一些, 北美不晓得
他们都是在Java开发中用于处理数据库交互的技术,它们有各自的特点,以下从多个方面介绍它们的区别:
1. 设计理念
- Spring JPA
- Spring JPA 是 Spring 对 JPA(Java Persistence API)规范的集成和扩展,它基于 ORM(对象关系映射)思想,旨在将 Java 对象与数据库表进行映射,让开发者可以通过操作 Java 对象来间接操作数据库,无需编写大量的 SQL 语句,注重对象化的操作,提高开发效率。
- MyBatis
- MyBatis 是一款半自动化的持久层框架,它同样支持 ORM,但更侧重于 SQL 的灵活使用。MyBatis 不会像 JPA 那样完全隐藏 SQL,而是允许开发者自己编写 SQL 语句,对 SQL 有更细粒度的控制,在性能优化和处理复杂业务逻辑时具有优势。
2. SQL 控制程度
Spring JPA
对于简单的增删改查操作,Spring JPA 可以根据方法名自动生成 SQL 语句,无需开发者手动编写。例如,定义一个继承自
JpaRepository的接口,通过命名规范定义方法,就可以实现基本的数据库操作。import org.springframework.data.jpa.repository.JpaRepository;
public interface UserRepository extends JpaRepository<User, Long> {
User findByUsername(String username);
}但对于复杂的 SQL 查询,虽然也可以使用
@Query注解手动编写 SQL,但相比之下不够灵活,特别是在处理复杂的多表关联查询时,可能会比较繁琐。
- MyBatis
- MyBatis 允许开发者直接编写 SQL 语句,可以将 SQL 语句写在 XML 文件或使用注解方式配置在 Java 代码中。这使得开发者可以根据具体的业务需求和数据库特性,编写高效、复杂的 SQL 语句,对 SQL 的控制非常灵活。
<select id="findUserByUsername" parameterType="String" resultType="User">
    SELECT * FROM users WHERE username = #{username}
</select>
- MyBatis 允许开发者直接编写 SQL 语句,可以将 SQL 语句写在 XML 文件或使用注解方式配置在 Java 代码中。这使得开发者可以根据具体的业务需求和数据库特性,编写高效、复杂的 SQL 语句,对 SQL 的控制非常灵活。
3. 学习成本
- Spring JPA
- 对于熟悉面向对象编程和 JPA 规范的开发者来说,Spring JPA 的学习成本相对较低。因为它提供了简单的 API 和自动生成 SQL 的功能,开发者只需要定义接口和方法,就可以完成基本的数据库操作。
- 然而,要深入掌握 Spring JPA 的高级特性,如自定义查询、性能优化等,仍然需要花费一定的时间和精力。
- MyBatis
- MyBatis 的学习曲线相对较陡,尤其是对于没有 SQL 基础的开发者来说。因为需要手动编写 SQL 语句,所以需要掌握一定的 SQL 知识和数据库操作技能。
- 同时,还需要了解 MyBatis 的配置文件、映射规则等,学习成本相对较高。
4. 性能表现
- Spring JPA
- 在处理简单的数据库操作时,Spring JPA 由于自动生成 SQL,性能表现良好。但在处理复杂的查询时,自动生成的 SQL 可能不是最优的,需要开发者进行手动优化。
- 另外,JPA 的缓存机制在一定程度上可以提高性能,但如果使用不当,也可能会导致性能问题。
- MyBatis
- 由于开发者可以手动编写 SQL,能够针对具体的业务场景和数据库进行优化,所以在处理复杂查询和大数据量操作时,MyBatis 的性能通常更有优势。
- 同时,MyBatis 的缓存机制也比较灵活,开发者可以根据需要进行配置。
5. 适用场景
- Spring JPA
- 适用于快速开发项目,尤其是对数据库操作要求不复杂,注重开发效率和代码简洁性的项目。例如,一些小型的 Web 应用、原型项目等。
- 对于团队中 SQL 能力相对较弱的开发者,Spring JPA 可以降低开发难度。
- MyBatis
- 适用于对 SQL 性能要求较高、业务逻辑复杂的项目。例如,企业级应用、数据处理系统等,需要对 SQL 进行精细优化和复杂的多表关联查询。
- 当项目需要与不同的数据库进行交互,并且需要根据不同数据库的特性编写不同的 SQL 时,MyBatis 更具优势。
暴力反射是啥
暴力反射指的是利用 Java 的反射机制,突破 Java 语言原本的访问控制限制(如私有访问修饰符 private),强行访问、修改对象的私有属性或调用私有方法。下面为你详细介绍暴力反射的原理、使用场景、示例代码及注意事项。
@Bean和@Component区别
在 Spring 框架里,@Bean 和 @Component 都和 Bean 的定义相关,但它们在使用场景、使用方式等方面存在明显差异,下面为你详细介绍:
作用层面
@Component- 这是一个通用的组件注解,属于类级别的注解。当你在一个类上使用
@Component注解时,就表明这个类是 Spring 管理的一个组件。Spring 会在启动时自动扫描带有@Component注解的类,并将其注册为 Bean。 - 除了
@Component外,Spring 还提供了几个语义更明确的衍生注解,如@Service(用于服务层组件)、@Repository(用于数据访问层组件)、@Controller(用于表现层控制器),它们本质上和@Component一样,只是为了让代码的语义更清晰。
- 这是一个通用的组件注解,属于类级别的注解。当你在一个类上使用
@Bean- 它是方法级别的注解,通常在配置类(使用
@Configuration注解的类)中使用。@Bean注解的作用是告诉 Spring,由该注解标注的方法将返回一个对象,这个对象会被注册为 Spring 容器中的 Bean。
- 它是方法级别的注解,通常在配置类(使用
使用方式
@Component
使用时直接将其添加到类的定义上,示例如下:import org.springframework.stereotype.Component;
public class MyComponent {
public void doSomething() {
System.out.println("Doing something...");
}
}
同时,要确保 Spring 的组件扫描功能开启,一般在配置类上添加 @ComponentScan 注解:import org.springframework.context.annotation.ComponentScan;
import org.springframework.context.annotation.Configuration;
(basePackages = "com.example")
public class AppConfig {
// 配置类的其他内容
}
@Bean
在配置类中使用@Bean注解标注一个方法,该方法返回一个对象,示例如下:import org.springframework.context.annotation.Bean;
import org.springframework.context.annotation.Configuration;
public class AppConfig {
public MyBean myBean() {
return new MyBean();
}
}
class MyBean {
public void doSomething() {
System.out.println("MyBean is doing something...");
}
}
灵活性
@Component
主要用于标注自定义的类,让 Spring 自动发现并注册为 Bean。这种方式适合那些你自己编写的、符合组件规范的类。但它的局限性在于,对于一些第三方库中的类,你无法直接在其类定义上添加@Component注解。@Bean
非常灵活,可以用于任何类的 Bean 定义,包括第三方库中的类。你可以在配置类中创建并配置这些类的实例,然后将其注册为 Bean。例如,你可以对 Bean 的创建过程进行更多的控制,如传入参数、进行初始化操作等:import org.springframework.context.annotation.Bean;
import org.springframework.context.annotation.Configuration;
public class AppConfig {
public ThirdPartyLibraryClass thirdPartyBean() {
ThirdPartyLibraryClass bean = new ThirdPartyLibraryClass();
bean.setSomeProperty("Some value");
return bean;
}
}
生命周期管理
@Component
Spring 会自动管理使用@Component注解的类的生命周期,包括实例化、依赖注入、初始化和销毁等过程。这些过程通常遵循 Spring 的默认规则。@Bean
使用@Bean注解时,你可以对 Bean 的生命周期进行更细粒度的控制。例如,你可以通过@Bean注解的initMethod和destroyMethod属性指定 Bean 的初始化方法和销毁方法:import org.springframework.context.annotation.Bean;
import org.springframework.context.annotation.Configuration;
public class AppConfig {
(initMethod = "init", destroyMethod = "destroy")
public MyBean myBean() {
return new MyBean();
}
}
class MyBean {
public void init() {
System.out.println("MyBean is initializing...");
}
public void doSomething() {
System.out.println("MyBean is doing something...");
}
public void destroy() {
System.out.println("MyBean is destroying...");
}
}
综上所述,@Component 适用于自动扫描和注册自定义组件,而 @Bean 更侧重于手动配置和管理 Bean,尤其是对于第三方库的类或需要精细控制 Bean 创建过程的场景。
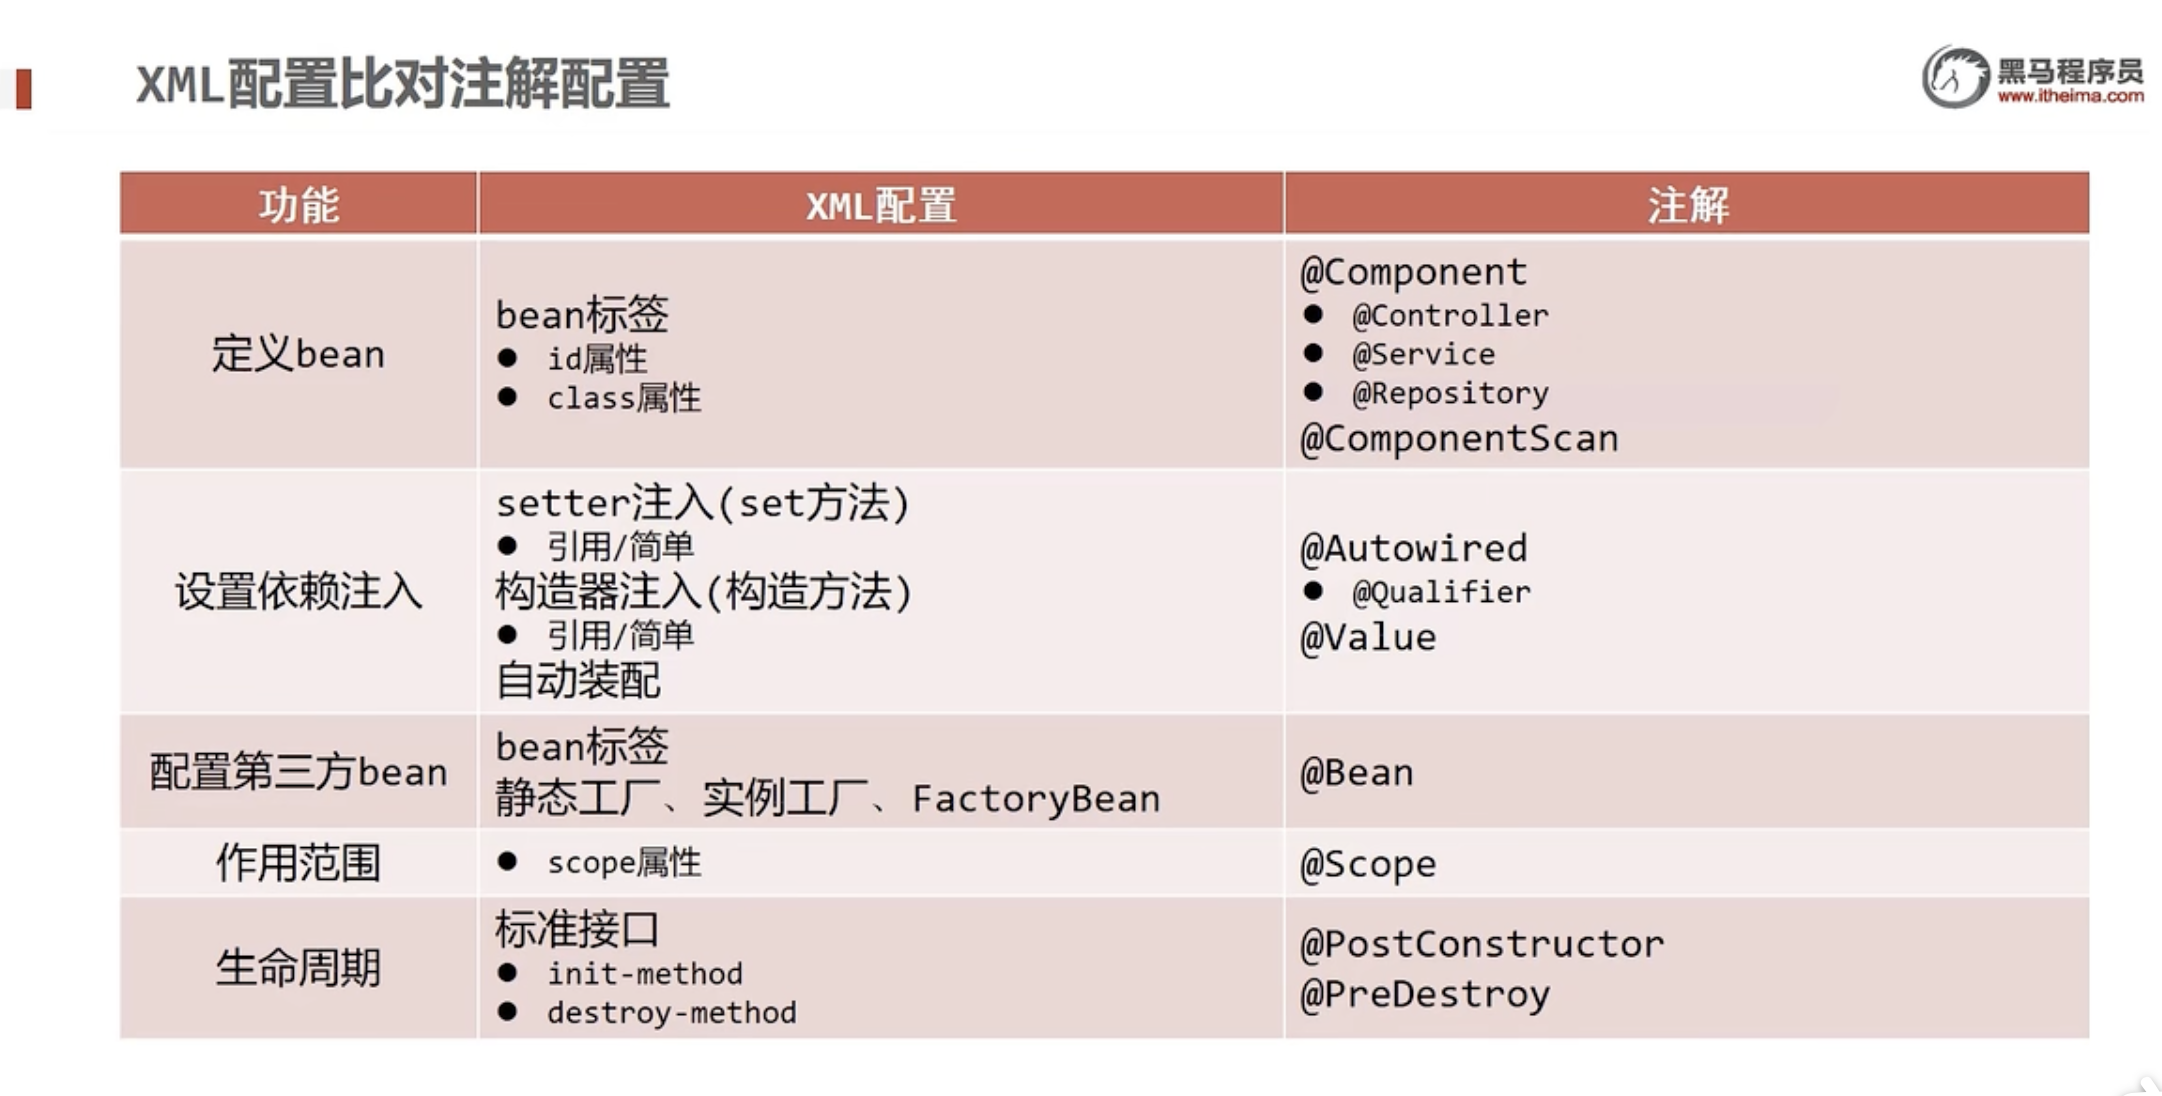
注解开发总结
jdbc是啥
JDBC 即 Java Database Connectivity(Java 数据库连接),它是 Java 编程语言用于与各种关系型数据库进行交互的标准 API。以下从概念、工作原理、核心组件、使用步骤、优缺点几个方面进行详细介绍:
概念
JDBC 由一组用 Java 语言编写的类和接口组成,为 Java 开发人员提供了一种统一的方式来访问不同类型的数据库,如 MySQL、Oracle、SQL Server 等,而无需关心具体数据库的实现细节。通过 JDBC,开发人员可以执行 SQL 语句,实现对数据库的查询、插入、更新和删除等操作。
工作原理
JDBC 采用了一种分层的架构,主要分为两层:应用程序层和驱动程序层。
- 应用程序层:开发人员编写的 Java 代码,通过调用 JDBC API 来执行数据库操作。
- 驱动程序层:负责与具体的数据库进行通信,将 JDBC API 调用转换为数据库能够理解的指令。不同的数据库需要不同的 JDBC 驱动程序,例如 MySQL 有 MySQL Connector/J 驱动,Oracle 有 Oracle JDBC 驱动等。
核心组件
JDBC 的核心组件主要包括以下几个接口和类:
- DriverManager:这是 JDBC 的管理层,负责加载 JDBC 驱动程序并建立与数据库的连接。它会根据不同的数据库 URL 来选择合适的驱动程序,并返回一个
Connection对象。 - Connection:代表与数据库的一个连接会话,通过
DriverManager.getConnection()方法获取。一个Connection对象可以创建多个Statement或PreparedStatement对象,用于执行 SQL 语句。 - Statement:用于执行静态 SQL 语句,它可以执行查询、更新等操作。但由于存在 SQL 注入的风险,在实际开发中使用相对较少。
- PreparedStatement:是
Statement的子接口,用于执行预编译的 SQL 语句。它可以有效防止 SQL 注入攻击,并且对于需要多次执行的 SQL 语句,性能更高。 - ResultSet:用于存储 SQL 查询的结果集。当执行查询语句后,会返回一个
ResultSet对象,通过它可以遍历查询结果,获取每一行的数据。
使用步骤
使用 JDBC 进行数据库操作一般需要以下几个步骤:
加载 JDBC 驱动程序:通过
Class.forName()方法加载相应的 JDBC 驱动类。例如,加载 MySQL 驱动:Class.forName("com.mysql.cj.jdbc.Driver");
建立数据库连接:使用
DriverManager.getConnection()方法建立与数据库的连接,需要提供数据库的 URL、用户名和密码。例如:String url = "jdbc:mysql://localhost:3306/mydb";
String username = "root";
String password = "password";
Connection connection = DriverManager.getConnection(url, username, password);创建
Statement或PreparedStatement对象:根据需要执行的 SQL 语句类型,创建相应的对象。例如,创建PreparedStatement对象:String sql = "SELECT * FROM users WHERE id = ?";
PreparedStatement preparedStatement = connection.prepareStatement(sql);
preparedStatement.setInt(1, 1);执行 SQL 语句:调用
Statement或PreparedStatement对象的executeQuery()方法执行查询语句,或executeUpdate()方法执行更新语句。例如:ResultSet resultSet = preparedStatement.executeQuery();
处理查询结果:如果执行的是查询语句,需要遍历
ResultSet对象获取查询结果。例如:while (resultSet.next()) {
int id = resultSet.getInt("id");
String name = resultSet.getString("name");
System.out.println("ID: " + id + ", Name: " + name);
}关闭资源:操作完成后,需要依次关闭
ResultSet、Statement和Connection对象,以释放资源。例如:resultSet.close();
preparedStatement.close();
connection.close();
优缺点
- 优点
- 通用性:提供了统一的 API,使得开发人员可以使用相同的代码结构来访问不同的数据库,提高了代码的可移植性。
- 灵活性:可以执行任意的 SQL 语句,对数据库进行各种操作,满足不同的业务需求。
- 性能:对于简单的数据库操作,JDBC 具有较高的性能,因为它直接与数据库进行交互,没有过多的中间层。
- 缺点
- 代码繁琐:使用 JDBC 进行数据库操作需要编写大量的样板代码,如加载驱动、建立连接、关闭资源等,增加了开发的工作量。
- 缺乏高级特性:JDBC 本身不提供对象关系映射(ORM)等高级特性,对于复杂的数据库操作,开发人员需要手动编写大量的 SQL 语句和数据转换代码。