Misc
353. When you API request or Frontend page loading slowly, how do you handle it?
- “frequency”: 0,
Key things:
- For large dataset request, you can use Pagination. Just like google search, you can split your data into batches, each request only fetch fixed amount of rows.
- Use cache instead of database visit, Frontend: cache the visited page data. Backend: in-memory java cache for monolithic application, distributed cache, redis, for microservices.
- Other tools can help improve read performance, like elasticsearch can boost the search.
- Database side: Optimize the SQL, use Sql tuning tools, like the Oracle explain plan. Add proper index (non-cluster index) on some frequently visited columns.
298. Key Difference: Soap vs Rest
- “frequency”: 0,
SOAP (Simple Object Access Protocol) and REST (Representational State Transfer) are both architectural styles used for data exchange over a network. They have several differences in design concepts, usage scenarios, etc. Here is a detailed introduction for you:
Protocol Characteristics
- SOAP: It is an XML-based protocol with a strict message format specification. It uses XML to describe the structure and content of messages. A SOAP message consists of parts such as Envelope, Header, and Body. This strict format makes message parsing and validation more standardized.
- REST: It is not a protocol but an architectural style. It doesn’t have a strict message format requirement. Usually, it uses various methods of the HTTP protocol (such as GET, POST, PUT, DELETE) to operate on resources. The message format can be XML, JSON, etc. However, due to its lightweight and simplicity, JSON is more widely used in RESTful APIs.
Data Transmission
- SOAP: Since XML is used for data transmission, the tags and structure of XML will increase the size of the data, resulting in relatively low transmission efficiency. However, the self-descriptiveness of XML makes SOAP messages clearer and easier to understand.
- REST: The JSON data format is relatively concise, small in size, and has high transmission efficiency. In the mobile Internet and scenarios with high performance requirements, the advantages of REST are more obvious.
Service Discovery
- SOAP: It usually uses WSDL (Web Services Description Language) to describe the interface and operations of the service. Clients can understand the functions and invocation methods of the service through WSDL. WSDL is an XML-based document that describes in detail the input and output parameters and operation methods of the service.
- REST: There is no specific service description language. Usually, API documentation is used to describe the interface and usage methods of the service. The design of RESTful APIs pays more attention to the use of resource URIs and HTTP methods, making the semantics of the interface more intuitive.
Error Handling
- SOAP: It has a dedicated error handling mechanism and passes error information through SOAP Fault. SOAP Fault contains the error code, description, and detailed information, enabling the client to accurately understand the cause of the error.
- REST: It usually uses HTTP status codes to represent errors. For example, 404 indicates that the resource was not found, and 500 indicates an internal server error, etc. Although HTTP status codes can provide basic error information, for some complex error scenarios, additional error descriptions may need to be added in the response body.
Security
- SOAP: It supports a variety of security mechanisms, such as WS-Security, which can encrypt, sign, and other operations on messages to ensure the security and integrity of messages. In addition, SOAP can be integrated with enterprise-level security systems, such as LDAP, Kerberos, etc.
- REST: It mainly relies on the security mechanisms of the HTTP protocol, such as HTTPS to ensure the security of data transmission. In terms of authentication, RESTful APIs usually use methods such as OAuth and JWT for identity authentication and authorization.
Usage Scenarios
- SOAP: It is suitable for enterprise-level application scenarios with high requirements for security, transactionality, and reliability, such as the financial and telecommunications industries. In these scenarios, the accuracy and integrity of data are of great importance, and the strict specifications and security mechanisms of SOAP can meet these needs.
- REST: It is more suitable for Internet applications, mobile applications, and other scenarios with high requirements for performance and development efficiency. The simplicity and flexibility of RESTful APIs enable developers to quickly build and iterate services.
Example Code Comparison
import requests |
import requests |
In conclusion, both SOAP and REST have their own advantages and disadvantages. When choosing which architectural style to use, a comprehensive consideration should be made according to specific application scenarios and requirements.
354. How do you implement security for your application or microservices
- “frequency”: 0,
Principles:
For Authentication
- Basic Authentication: use username and password authentication. the password should be encrypted. common encryption algorithm: BCrypt, SHA256, RSA.
- JWT Token: When the first time user login with username and password, backend will create a JWT token which contains the user info, the token will be stored in the frontend cookie. Every single request will carry this token, backend will validate this token to decide if user is authenticated. A token usually has a expiration time.
- Asymmetric key pairs: this is used for something like AWS command portal validation. It create a private key on server side and give public key to the client side. client with public key should be able to match with the private key on the server side.
- OAuth2: this is like 3rd party SSO (single sign on). Like for some applications, you can login with google or facebook. The application is pre-registered with the 3rd party, when a user login, it sends a request to 3rd party authentication server and gets a token, and once got the token, it will use that token to call the 3rd party authorization server to get the user role. [Learn more]
For Authentication:
- OAuth2 is a authorization method.
- For other authentication, we can have AntMatcher to match the routes/paths and use hasRole to allow particular role to access it.
Implementations:
In spring, we can override the WebSecurityConfigureAdaptor class, it is part of the security filter chain and it contains configure method, we will need to override the configure method and override the UserDetails object and UserDetailService class.
451. What is micro frontend/ micro UI and how micro frontend communicate with each other
- “frequency”: 5,
- micro frontend is just like microservcie in backend, it splits the frontend into multiple module based applications
TO communicate
- Use parameter based URL to carry data
- Use events, one module emit events, another module subscribe to the events
- Use shared data store, like NgRx.
30. Can you talk about CI/CD?
- “frequency”: 5,
KeyPoints:
- CICD is continuous integration and continuous deployment. In the project, we usually use Jenkins with its pipeline scripts to implement CICD.
- The script contains multiple parts. The
stagesparts list each stage and the steps inside. For example, stage one ischeckoutand steps in this stage are like using git clone to checkout the code from repository and then use maven to package it etc. Another part of the script ispostpart which handles different result. For example, what to do when the build is success or failure, what to do when the test cases failed etc. - CICD usually starts from when the code is pushed to the target branch, and then it includes checkout and package the code, deploy the jar/war, run the test cases and send reports etc. It could cover from dev to QA/Staging environment, but usually does not cover production.
235. How to use docker in the Spring Boot?
- “frequency”: 2,
Docker is a container with flexible memory management and has dockerHub that you can upload or download images
To use with Spring boot, 1) include docker dependency 2) add a Dockerfile
347. ElasticSearch why do you use it
- “frequency”: 3,
Elastic Search is an engine to make search data very faster. It is usually put between backend application and database, it works like a cache or a database. Some people think it is a databse, but it is actually defined to only optimize search.
ElasticSearch use index to cache out all the fields you want to search, just like the database Non-Cluster Index.
For example, you have JSON:
Product{ |
You can add the fields or the description texts as the index so you can search any text match in the name or description. It is very fast.
41. Git command you used in the project
- “frequency”: 2,
There are 2 common repositories working with git: Github and Bitbucket
- Clone from repository as new project: git clone URL
- Steps to commit change to remote repository: git add (files), git commit (-m message), git push
- get remote data: git pull or git fetch (git fetch just read remote repository, git pull is git fetch + push to current local branch)
- rebase and merge: git rebase, git merge
- create a branch: git checkout branchName
- delete a branch: git branch -d branchName
- to override current branch with remote: git reset –hard remoteHead
370. difference git merge and rebase
- “frequency”: 2,
Suppose you have 2 branches: f1 and f2 bot derived from main branch and both have some commits. now you are on f1 and you want the commits from f2.
Merge: combine all commits from f1 and f2 as a new commit and put on f1. so merge will create a new commit.
Rebase: your f1 is based on main, rebase is to let your f1 branch based on f2. it will make f2 as the new base for f1.
link: https://www.atlassian.com/git/tutorials/merging-vs-rebasing
375. Difference between Iterator and Enumeration
- Both use to loop java collections.
- Iterator: can remove elements when iterator.
    import java.util.ArrayList;
    import java.util.Iterator;
    public class IteratorRemoveExample {
        public static void main(String[] args) {
            ArrayList<Integer> list = new ArrayList<>();
            list.add(1);
            list.add(2);
            list.add(3);
            Iterator<Integer> iterator = list.iterator();
            while (iterator.hasNext()) {
                int element = iterator.next();
                if (element % 2 == 0) {
                    iterator.remove();
                }
            }
            System.out.println(list);
        }
    }
- Enumeration: cannot remove elements.
    ```java
    import java.util.Enumeration;
    import java.util.Vector;
    public class EnumerationExample {
        public static void main(String[] args) {
            Vector<String> vector = new Vector<>();
            vector.add("Apple");
            vector.add("Banana");
            Enumeration<String> enumeration = vector.elements();
            while (enumeration.hasMoreElements()) {
                System.out.println(enumeration.nextElement());
            }
        }
    }
209. How do you use cache in your whole project?
- “frequency”: 3,
Also refer to the problem of how do you improve performance
Cache can be used directly based on different applications.
Frontend, you can cache the page out, you can also cache the data out, so the whole page will be cached.
Backend
- Inside Java, you can use java native cache, just like static hashmap can cache data as key-value entries
- For application level or microservices, you can use distributed cache, like Redis or MemCached.
40. If you have error, but it is not showing in log, how do you debug and find it.
“frequency”: 4,
When you have an error that is not showing in the log, here are some steps you can take to debug and find it:
- Review the code: Look for any obvious mistakes, such as incorrect variable names, missing parentheses, or logical errors in the algorithm. Check for any recently made changes that could have introduced the error.
- Add additional logging statements: Insert print statements or use a logging library to output relevant variable values, function calls, and program flow information at various points in the code.
- Use a debugger: If available, use a debugger tool. You can set breakpoints at specific lines of code and then step through the program execution.
- Check the environment: Verify that the runtime environment is set up correctly.
- Test in isolation: If possible, isolate the code that is causing the problem and test it in a simpler, controlled environment.
- Check for external factors: Consider if there are any external factors that could be causing the error, such as network issues, database problems, or interactions with other services.
- Review stack traces and error messages: Even if the error is not showing in the regular log, check if there are any other sources of error information, such as stack traces that might be printed to the console or in other log files.
- Use error handling and assertions: Add more comprehensive error handling and assertions to your code.
- Ask for help: If you are still unable to find the error, reach out to colleagues or online communities for assistance.
240. What kind of test experience do you have?
- “frequency”: 5,
Unit test: Junit, mockito, powermock – test each method, this is method level. The way to write unit test is to define a hard code input and call the target method and then verify if the result is correct using assert.
Automation test: Selenium, Cucumber, TestNG
Regression test: is to make sure the new part of code does not break the existing functions
Integration test: is to make sure the new parts interacts/works well with the other parts.
End to End test: is to make sure the entire workflow works from beginning to end.
Regression/Integration/End2End tests are just different type of tests, they are mostly implemented by Selenium and Cucumber or TestNG.
245. Cucumber and its annotations / How cucumber works, give an example
- “frequency”: 5,
When they ask what test framework have you done, always mention Junit/Mockito and Selenium/Cucumber
Cucumber aims to create tests cases that both business team and developers can understand. Business team knows the requirements but does not know how to write test cases, developer team knows how to write test cases but not very familiar with the requirements. Cucumber uses Gherkins language with feature file and step definitions script to connect them.
Feature file defines test scenarios like below, it uses keyword like scenario, given, when, and, then:
- Feature: Login Functionality
- Scenario: Successful login with valid credentials
- Given: the user is on the login page
- When: the user enters a valid username and password
- And: clicks the login button
- Then: the user should be redirected to the dashboard page
The step definitions file uses annotations like @Given @When @Then to write test cases. @Given is for given conditions, @When is for input @Then is for result.
For example for login, @Given is user is at the login page, @When is a method when user enters the credentials and click login, @Then will be a method to verify the user enters homepage.
these annotations use brackets to include the feature file steps
{ |
Java
43. Abstract class vs. Interface. When to use abstract class and when to use interface?
- “frequency”: 5,
- Abstract Class:
- 1) still a class, so you can only extend one abstract class.
- 2) Have both concrete method and abstract method.
- Interface:
- 1) you can implement many interfaces
- 2) Only has abstract method.
- 3) In java 8, interface can have default and static method
Usage:
Most of the places, interfaces are preferred, but if you need some common method to inherit automatically, you can use abstract class.
FOLLOW UP:
since java 8 allows default and static method in interface, what is the essential difference between abstract class and interface?
A: abstract class can have fields, the fields can hold value and track the status of the object itself. Interface cannot have fields, it can only have constants.
Difference Between Interface and Abstract Class in Java
In Java, interfaces and abstract classes are both used to define templates or contracts for other classes, but they have distinct purposes and characteristics. Below is a comparison with examples to clarify their differences.
Key Differences
| Feature | Interface | Abstract Class |
|---|---|---|
| Keyword | interface | abstract |
| Inheritance | A class can implement multiple interfaces. | A class can extend only one abstract class. |
| Method | Implementation Methods are abstract by default (except default methods, which can have implementations). |
Can contain both abstract and concrete (regular) methods. |
| Fields | Can only have public static final constants. |
Can have instance variables. |
| Constructors | Not allowed. | Can have constructors. |
| Default Access Level | Methods are implicitly public. |
Methods can have public, protected, or package-private access. |
| Use Case | Defines a contract or capability. | Defines shared characteristics or behavior. |
Example 1: Using an Interface
An interface is used to define a set of behaviors (a contract) that a class must implement.
// Define an interface |
Example 2: Using an Abstract Class
An abstract class is used when you want to share common code among related classes while still requiring subclasses to provide specific implementations.
// Define an abstract class |
When to Use:
- Interface:
- Use an interface to define a set of behaviors or capabilities that a class must adhere to, without concerning how they are implemented.
- Example: The Runnable interface defines the ability to be run in a thread.
- Abstract Class:
- Use an abstract class to represent shared characteristics or behavior while allowing subclasses to override specific parts.
- Example: The HttpServlet abstract class provides a framework for handling HTTP requests while letting you implement methods like doGet() or doPost().
44. New feature of Java 8. Give an example of how you use them in your project
- “frequency”: 5,
Top of java 8 features:
- Functional interface: is an interface that only has ONE abstract method. We can use lambda expression to implement that method
- Lambda expression: () -> {}. It is to implement functional interface and anonymous class. You can pass a lambda function to a method as argument
- Optional: to prevent NullPointerException in runtime. for example, Optional
, it has methods like isPresent(), isEmpty(), get(), orElse() etc. - Default method in interface:
- Why need it: When a interface has 10 children classes, all children classes need the same method, before java 8, you need to implement this same method in every child class, but with default method, you just write it once as default method in interface, all children will automatically inherit it.
- If a class implements 2 interfaces and both interfaces has same
defaultmethod, then there will be exception because the class does not know which on to use, the class then has to override them.
- Stream API: a group of methods to handle collections easily. like, filter, map, flatmap, sorted, reduce, groupingBy, joining etc.
- Intermediate operator vs terminator operator
- flatmap vs map
- Java Date Time API update: new date time API has default timezone, so developer does not need to set it.
Lambda Expressions
Lambda expressions enable a more concise way to represent code blocks that can be passed to methods or stored in variables.
Example: In an e-commerce project, filtering a list of products by price. Suppose there is a Product class with a price field.import java.util.ArrayList;
import java.util.List;
import java.util.stream.Collectors;
class Product {
private double price;
private String name;
public Product(double price, String name) {
this.price = price;
this.name = name;
}
public double getPrice() {
return price;
}
}
public class Main {
public static void main(String[] args) {
List<Product> products = new ArrayList<>();
products.add(new Product(100, "Product1"));
products.add(new Product(200, "Product2"));
products.add(new Product(150, "Product3"));
// Use Lambda expression to filter products with price greater than 150
List<Product> filteredProducts = products.stream()
.filter(product -> product.getPrice() > 150)
.collect(Collectors.toList());
filteredProducts.forEach(product -> System.out.println(product.getPrice()));
}
}
Method References
Method references provide a more concise way to refer to existing methods.
Example: In a logging project, there is a Logger class with a logMessage method for logging messages.import java.util.Arrays;
import java.util.List;
class Logger {
public static void logMessage(String message) {
System.out.println("Logging: " + message);
}
}
public class Main {
public static void main(String[] args) {
List<String> messages = Arrays.asList("Message1", "Message2", "Message3");
// Use method reference to apply the logging method to each message
messages.forEach(Logger::logMessage);
}
}
Optional Class
The Optional class is used to solve the problem of null pointer exceptions and handle potentially null values more gracefully.
Example: In a user management system, getting a user’s email address. Suppose the User class has a getEmail method that might return null.import java.util.Optional;
class User {
private String email;
public User(String email) {
this.email = email;
}
public String getEmail() {
return email;
}
}
public class Main {
public static void main(String[] args) {
User user = new User("example@example.com");
// Use Optional class to safely get the user's email address
Optional<String> emailOptional = Optional.ofNullable(user.getEmail());
String email = emailOptional.orElse("default@example.com");
System.out.println("Email: " + email);
}
}
45. Stream API
lazy evaluation
What is lazy evaluation in Stream?
Stream intermediate operations are lazily executed and only run when a terminal operation is invoked. This improves performance and avoids unnecessary work.
import java.util.Arrays; |
output:Before terminal operation:
After building the stream pipeline but before terminal operation
Starting terminal operation:
Filtering: 1
Filtering: 2
Mapping: 2
4
Filtering: 3
Filtering: 4
Mapping: 4
8
真题
给 "Pencil", "Pencil", "Note", "Pen", "Book", "Pencil", "Book");
过滤掉长度小于等于3的字符串, 并请按字符串分组并统计出现次数来排序输出(按值降序)为:
"Pencil" - 3 |
解法:import java.util.*;
import java.util.stream.Collectors; // important!!
class Test {
public void example() {
List<String> list2 = Arrays.asList("Pencil", "Pencil", "Note", "Pen", "Book", "Pencil", "Book");
// / 按字符串进行分组并统计每个字符串的出现次数
Map<String, Long> map = list2.stream()
.filter(s -> s.length() > 3) // 过滤长度大于3的字符串
.collect(Collectors.groupingBy(
s -> s, // 按字符串本身分组
Collectors.counting() // 对每个字符串进行计数
));
// 输出原始 map
System.out.println("Original map: " + map);
// 按计数值降序排序并输出
map.entrySet().stream()
.sorted((a, b) -> b.getValue().compareTo(a.getValue())) // 下面这行也可以
// .sorted(Comparator.comparing(Map.Entry<String, Long>::getValue).reversed())
.forEach(entry -> System.out.println(entry.getKey() + " - " + entry.getValue()));
// ------ steamAPI other examples ------
List<String> list = Arrays.asList("apple", "banana", "apricot", "blueberry");
// list.toArray();
// List<String> list5 = new String[]{"5", "6"};
Map<Character, List<String>> grouped = list.stream()
.collect(Collectors.groupingBy(s -> s.charAt(0)));
// 按首字母分组
// {a=[apple, apricot], b=[banana, blueberry]}
System.out.println(grouped);
List<String> list2 = Arrays.asList("Pencil", "Pencil", "Note", "Pen", "Book", "Pencil", "Book");
// / 按字符串进行分组并统计每个长度大于3的字符串的出现次数
Map<String, Long> map = list2.stream()
.filter(s -> s.length() > 3) // 过滤长度大于3的字符串
.collect(Collectors.groupingBy(
s -> s, // 按字符串本身分组
Collectors.counting() // 对每个字符串进行计数
));
// 输出原始 map
// Original map: {Book=2, Note=1, Pencil=3}
System.out.println("Original map: " + map);
// 按计数值降序排序并输出
/*
Pencil - 3
Book - 2
Note - 1
*/
map.entrySet().stream()
.sorted((a, b) -> b.getKey().compareTo(a.getKey()))
.forEach(s -> System.out.println(s.getKey() + " - " + s.getValue()));
map.entrySet().stream()
.sorted(Comparator.comparing(Map.Entry<String, Long>::getValue).reversed())
.forEach(entry -> System.out.println(entry.getKey() + " - " + entry.getValue()));
// map.entrySet().stream()
// .sorted(Comparator.comparing(Map.Entry::getValue).reversed())
// .forEach(s -> System.out.println(s.getKey() + " - " + s.getValue()));
}
}
public class Main {
public static void main(String[] args) {
Test test = new Test();
test.example();
}
}
中间操作
中间操作会返回一个新的流,允许你进行链式调用。常见的中间操作有 filter、map、flatMap、distinct、sorted 等。
终端操作
终端操作会触发流的处理并产生结果,常见的终端操作有 forEach、collect、reduce、count、findFirst、anyMatch 等。
以下是不同类型操作的示例代码:
代码解释
中间操作:
- filter:用于筛选出满足指定条件的元素。
- map:将流中的每个元素映射为另一个元素。
- flatMap:将嵌套的流扁平化。
- distinct:去除流中的重复元素。
- sorted:对流中的元素进行排序。
终端操作:
- forEach:遍历流中的每个元素。
- collect:将流中的元素收集到一个集合中。
- reduce:对流中的元素进行归约操作,例如求和。
- count:统计流中元素的数量。
- findFirst:查找流中的第一个元素。
- anyMatch:判断流中是否有元素满足指定条件。
通过这些示例,你可以了解到 Stream API 不同类型操作的使用方法和效果。
import java.util.Arrays; |
只有List才能有stream吗
并非只有 List 能使用 stream 方法。在 Java 里,很多集合类以及其他类型都可以使用 stream 方法来创建流,以下为你详细介绍:
1. 实现 Collection 接口的集合类
Collection 接口拓展了 stream() 方法,所以所有实现 Collection 接口的类都能够调用此方法生成流。常见的有:
List:像ArrayList、LinkedList这类。import java.util.ArrayList;
import java.util.List;
public class ListStreamExample {
public static void main(String[] args) {
List<String> list = new ArrayList<>();
list.add("apple");
list.add("banana");
list.add("cherry");
long count = list.stream().filter(s -> s.startsWith("a")).count();
System.out.println("以 'a' 开头的元素数量: " + count);
}
}Set:例如HashSet、TreeSet。import java.util.HashSet;
import java.util.Set;
public class SetStreamExample {
public static void main(String[] args) {
Set<Integer> set = new HashSet<>();
set.add(1);
set.add(2);
set.add(3);
// int sum = set.stream().mapToInt(Integer::intValue).sum();
int sum = set.stream().mapToInt(x -> x).sum();
System.out.println("集合元素总和: " + sum);
}
}Queue:像LinkedList(它同时实现了List和Queue接口)、PriorityQueue。import java.util.LinkedList;
import java.util.Queue;
public class QueueStreamExample {
public static void main(String[] args) {
Queue<String> queue = new LinkedList<>();
queue.add("one");
queue.add("two");
queue.add("three");
queue.stream().forEach(System.out::println);
}
}
2. 数组
虽然数组没有直接实现 Collection 接口,不过可以借助 Arrays 工具类的 stream 方法来创建流。import java.util.Arrays;
public class ArrayStreamExample {
public static void main(String[] args) {
int[] array = {1, 2, 3, 4, 5};
int sum = Arrays.stream(array).sum();
System.out.println("数组元素总和: " + sum);
}
}
3. 其他
Map:Map本身没有stream()方法,但可以通过其keySet()、values()或者entrySet()方法得到对应的集合,再创建流。import java.util.HashMap;
import java.util.Map;
public class MapStreamExample {
public static void main(String[] args) {
Map<String, Integer> map = new HashMap<>();
map.put("apple", 1);
map.put("banana", 2);
map.put("cherry", 3);
long count = map.entrySet().stream().filter(entry -> entry.getValue() > 1).count();
System.out.println("值大于 1 的键值对数量: " + count);
}
}Stream类的静态方法:可以直接利用Stream类的静态方法创建流,例如Stream.of()、Stream.iterate()、Stream.generate()等。import java.util.stream.Stream;
public class StaticStreamExample {
public static void main(String[] args) {
Stream<Integer> stream = Stream.of(1, 2, 3, 4, 5);
// int sum = stream.mapToInt(Integer::intValue).sum();
int sum = stream.mapToInt(x -> x).sum();
System.out.println("流元素总和: " + sum);
}
}
46. Types of Exceptions and how do you deal with exceptions in your project?
- “frequency”: 5,
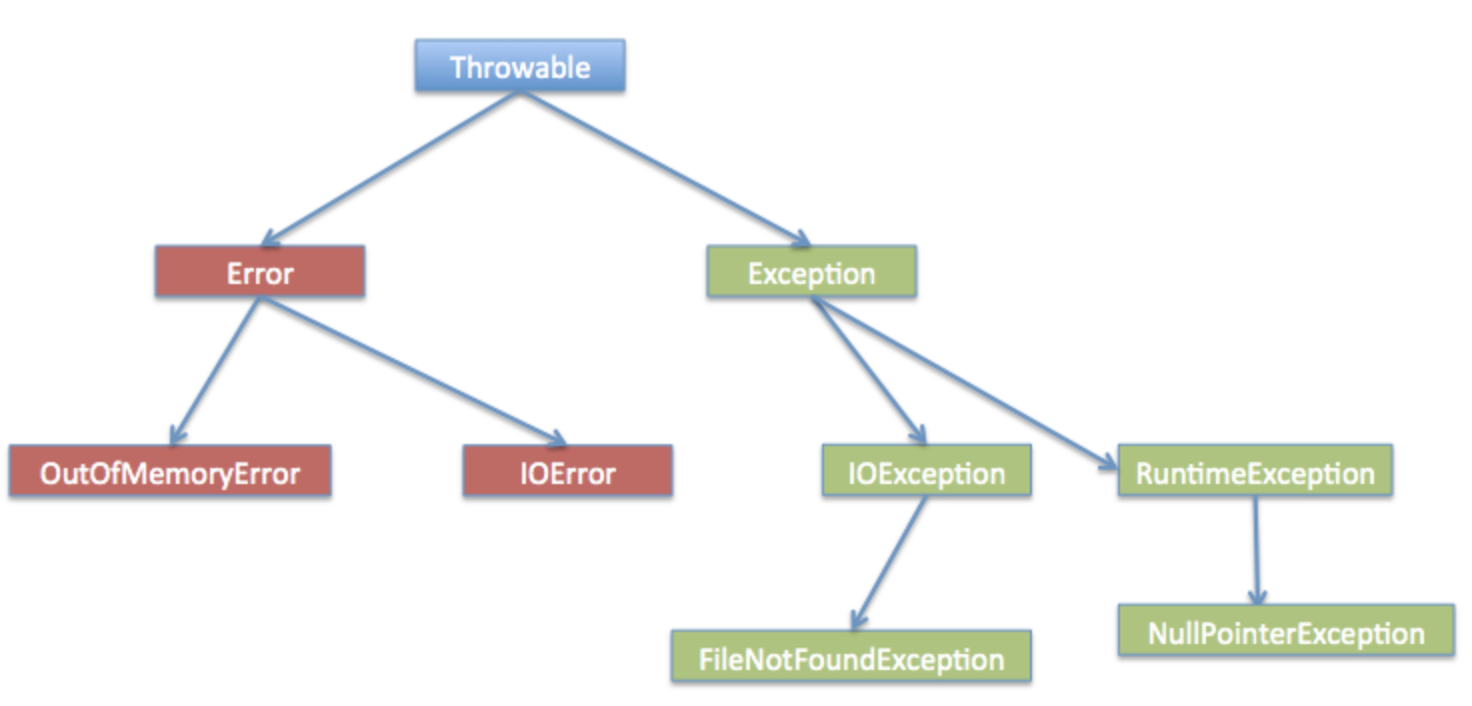
Java Exception hierarchy:
throwable
- error
- error is like system error which can NOT be handled by program, like OutOfMemoryError, StackOverflowError etc.
exception.
Exception – compile/checked exception + runtime/unchecked exception. Checked exception can be handled using try catch block, like the SQLException, Thread InterrupttedException; Unchecked exception happens in runtime, like NullPointerException, IndexOutOfBoundException etc.
self defined exception: Just extend the java Exception class and define your own constructor and message
- error
- How to deal with exception
- Java: use Try/Catch/Finally block or use Throws on method level.
- Spring: use @ExceptionHandler @ControllerAdvice on the controller level to catch exception in whole application
Java Exception hierarchy:
- throwable =
error+exception. error is like system error which can NOT be handled by program, like OutOfMemoryError, StackOverflowError etc.
Exception – compile/checked exception + runtime/unchecked exception. Checked exception can be handled using try catch block, like the SQLException, Thread InterrupttedException; Unchecked exception happens in runtime, like NullPointerException, IndexOutOfBoundException etc.
- self defined exception: Just extend the java Exception class and define your own constructor and message
- How to deal with exception:
- Java: use Try/Catch/Finally block or use Throws on method level.
- Spring: use @ExceptionHandler @ControllerAdvice on the controller level to catch exception in whole application
47. Generics and how do you use generics in your project?
- “frequency”: 3,
Generics is used to prevent the error when converting data from one type to another type or just to make a method work for multiple type of data.
public V getFirstElement(List<T> list) { |
Usually T is used to present Type and V is used to represent Value.
With generics, we can 1) make sure the type is safe at compile time. 2) make a method or class work for different type of data.
48. Java OOP 4 principles, and explain each of them
- “frequency”: 5,
PIEA:
Polymorphism: 2 types, static polymorphism/overload and dynamic polymorphism/override. overload is you have 2 methods in the same class, they have SAME method name but different type or numbers of parameters . They can have different access modifier too (they are basically just 2 different methods happening to have the same name).
Override: 2 methods with same method signature(method name, parameters) in Parent and Child class, but different implementations. The child method must have same or broader access modifier than parent method.
Inheritance: One class can only inherit one parent class, one class can implement many interfaces
Encapsulation: This is about who can access your method or fields, Access modifer: Public, Private, Protected, Default.
Abstraction: abstract class and interfaces.
49. If java 8 allows default method in interface, so what is the real difference between interface and abstract class?
- “frequency”: 4,
abstract class can have regular fields which can host the data, but interface cannot, interface can only have constants.
52. Serialization, What is Serializable and SerialVersionUID?
- “frequency”: 4,
Serialization is to convert the java object into byte stream so you can save it to file system or database or send across network.
To implement serialization, just implement serializable interface. private and final fields can be serialized, but static field cannot, because static field does not go with objects.
When a serialVersionUID is presented, it is used to match the byte stream with current java object, if they match, the object can be de-serialized, otherwise, exception will be thrown.
What is serialVersionUID?
serialVersionUIDis a unique identifier for a serializable class. It is used during deserialization to ensure that the sender and receiver of a serialized object have compatible versions of that class. It is stored as alongvalue in the serialized object.
When you don’t define serialVersionUID
Behavior:
- If you do not explicitly define a
serialVersionUIDin your serializable class, the Java runtime will automatically generate one for you at runtime based on various aspects of the class, such as the fields, methods, and other characteristics of the class. - This auto-generated
serialVersionUIDis computed using a complex algorithm that takes into account the class name, the interfaces it implements, and other factors.
- If you do not explicitly define a
Implications:
- Compatibility issues: Any change in the class structure (e.g., adding or removing fields, changing the type of a field, or modifying methods) will cause the runtime to generate a different
serialVersionUID. This means that if you serialize an object with one version of the class and then try to deserialize it with a modified version of the class, the deserialization will fail with anInvalidClassException. Example: Consider the following serializable class:
import java.io.Serializable;
class MyClass implements Serializable {
    private int value;
    // Constructor, getters, and setters
    public MyClass(int value) {
        this.value = value;
    }
}
If you serialize an object of
MyClassin one version of your application, and then you modify theMyClassby adding a new field, like this:import java.io.Serializable;
class MyClass implements Serializable {
private int value;
private String name;
// Constructor, getters, and setters
public MyClass(int value, String name) {
this.value = value;
this.name = name;
}
}
Then, when you try to deserialize the previously serialized object, you will get an
InvalidClassExceptionbecause the auto-generatedserialVersionUIDhas changed.
- Compatibility issues: Any change in the class structure (e.g., adding or removing fields, changing the type of a field, or modifying methods) will cause the runtime to generate a different
When you remove serialVersionUID
- Behavior:
- If you initially define a
serialVersionUIDand then remove it from your class, the Java runtime will again generate a new one based on the current state of the class.
- If you initially define a
Implications:
- Compatibility issues: Similar to not defining it initially, removing the
serialVersionUIDcan lead to deserialization failures. If you have serialized objects using the old version of the class with a definedserialVersionUIDand then remove it, the deserialization process will try to use the auto-generatedserialVersionUID, which is likely to be different from the original one, resulting in anInvalidClassException. Example: Consider this class with a defined
serialVersionUID:import java.io.Serializable;
class MyClass implements Serializable {
private static final long serialVersionUID = 123456789L;
private int value;
// Constructor, getters, and setters
public MyClass(int value) {
this.value = value;
}
}If you serialize objects with this version of
MyClass, and then you remove theserialVersionUIDfrom the class like this:import java.io.Serializable;
class MyClass implements Serializable {
private int value;
// Constructor, getters, and setters
public MyClass(int value) {
this.value = value;
}
}When you try to deserialize the previously serialized objects, you will face
InvalidClassExceptionas the deserialization process will use the new auto-generatedserialVersionUIDwhich will not match the old one.
- Compatibility issues: Similar to not defining it initially, removing the
Best Practices
Explicitly define
serialVersionUID:- It is generally recommended to explicitly define
serialVersionUIDin your serializable classes. This way, you have more control over versioning. You can decide when a change in the class should break compatibility and when it should not. Example:
import java.io.Serializable;
class MyClass implements Serializable {
    private static final long serialVersionUID = 123456789L;
    private int value;
    // Constructor, getters, and setters
    public MyClass(int value) {
        this.value = value;
    }
}
If you later modify the class by adding a new field but decide that it should still be compatible with the previously serialized objects, you can keep the
serialVersionUIDthe same. However, if you decide that the changes are significant enough to break compatibility, you can change theserialVersionUID.
- It is generally recommended to explicitly define
Serialization and Deserialization Example
Here is a simple example of serializing and deserializing an object:
import java.io.FileOutputStream;
import java.io.ObjectOutputStream;
import java.io.FileInputStream;
import java.io.ObjectInputStream;
import java.io.Serializable;

class MyClass implements Serializable {
    private static final long serialVersionUID = 123456789L;
    private int value;
    public MyClass(int value) {
        this.value = value;
    }
    public int getValue() {
        return value;
    }
}

public class SerializationExample {
    public static void main(String[] args) {
        MyClass obj = new MyClass(42);
        try {
            // Serialization
            FileOutputStream fileOut = new FileOutputStream("object.ser");
            ObjectOutputStream out = new ObjectOutputStream(fileOut);
            out.writeObject(obj);
            out.close();
            fileOut.close();

            // Deserialization
            FileInputStream fileIn = new FileInputStream("object.ser");
            ObjectInputStream in = new ObjectInputStream(fileIn);
            MyClass deserializedObj = (MyClass) in.readObject();
            in.close();
            fileIn.close();
            System.out.println(deserializedObj.getValue());
        } catch (Exception e) {
            e.printStackTrace();
        }
    }
}
In this example, the
MyClassobject is serialized to a file and then deserialized. If you change theMyClassand want to maintain compatibility, you should keep theserialVersionUIDconstant. If you want to break compatibility, change theserialVersionUID.
53. HashMap: how does it work internally, what is hash collision
- “frequency”: 5,
VERY IMPORTANT!!!
HashMap has 2 key important methods, equals() and hashcode()
Think there is a list of buckets, each bucket is identified by a hashcode.
When you call get(key), the key will first be passed to hashcode() method and a hashcode is returned, Use this hashcode, you can locate the corresponding bucket. Inside that bucket, it is a tree structure of all key-value pairs that share the same hashcode. so to find the target key-value pair, the equals() method will be called, and once found, the value will be returned.
Hash collision: all the key-value pair that shares the same hashcode stays in same bucket, that is called hash collision. It is preferred in hashmap, because if there is NO hash collsion, each key-value pair will stay in one bucket, then there will be too many buckets, causing too much memory. If all entries in one bucket, then it is hard to search the target. The hash collision makes the time complexity of hashmap to O(1) because of hashing.
Why hashmap use Tree structure in bucket: Previously it is a list, but then changed to tree, because tree has left node smaller than root and root smaller than right. So the search is O(logN), much faster than list.
59. What is the Functional Interface? Java 8 built in functional interface?
- “frequency”: 5,
Function interface is in java 8, it can only contain Single Abstract Method. You can use lambda to implement it.
Java built-in function interface:
Consumer: the method takes input but NO output. Example: System.out.println(input)
Supplier: the method takes NO input but HAS output. Example: RandomNumberGenerator.
Predicate!: the method return boolean type, true or false, it is widely used in stream().filter(predicate) to filter out collections
Function: the method takes INPUT and RETURN output. it is used to convert data, like stream().map(function)
Binary Operator: the method has 2 input and 1 same type output: like int add(int a, int b)
there are other types, but you only need to anser, the top 4.
67. Implement a singleton
- “frequency”: 5,
import java.io.Serializable; |
68. Do you know about the Executor Service and Future?
- “frequency”: 5,
Executor Service has thread pool. It can be used run multi threads in parallel.
Thread Pool:
- Fixed Thread Pool: create fixed number of threads no matter you will use it or not
- Cached Thread Pool: create threads based on needs, if new task is coming and no threads available, it will create new thread. If a thread idle for some time, it will be terminated.
- Scheduled Thread Pool: can be used to set delays and schedule tasks
- Fork Join Pool: It uses a work-stealing algorithm, the tasks are break into many small pieces. If some threads are done with their tasks, they can steal other threads task to run. This will have better performance.
When the task has return (callable tasks)
Use Future object to host the return. The tasks are like async process, they are submitted, and later on, if there is a return comes back, the return will be stored in Future object.
Future has method like get() to get result or isDone() to check if task is completed.
Executor Service
- The
ExecutorServiceis an interface in Java that provides a higher-level abstraction for executing tasks asynchronously compared to using raw threads. It is part of thejava.util.concurrentpackage. - It manages a pool of threads, which can be used to execute
RunnableorCallabletasks. By using anExecutorService, you don’t have to deal with the low-level details of thread creation, management, and destruction. - You can submit tasks to the
ExecutorService, and it will handle scheduling and execution of those tasks using its thread pool. - Some commonly used implementations of
ExecutorServiceincludeThreadPoolExecutorandScheduledThreadPoolExecutor. Example of creating an
ExecutorService:import java.util.concurrent.ExecutorService;
import java.util.concurrent.Executors;
public class ExecutorServiceExample {
public static void main(String[] args) {
// Creates a fixed-size thread pool with 5 threads
ExecutorService executorService = Executors.newFixedThreadPool(5);
// Submits a Runnable task
executorService.execute(() -> {
System.out.println("Task executed by thread: " + Thread.currentThread().getName());
});
// Shuts down the executor service after all tasks are completed
executorService.shutdown();
}
}In the code above:
Executors.newFixedThreadPool(5)creates a fixed-size thread pool with 5 threads.executorService.execute()submits aRunnabletask to the executor service for execution. TheRunnabletask is defined using a lambda expression, which simply prints the name of the thread that executes the task.executorService.shutdown()shuts down the executor service after all submitted tasks have completed.
Future
- The
Futureinterface represents the result of an asynchronous computation. It is used in conjunction withExecutorServicewhen you submit aCallabletask. - A
Callableis similar to aRunnable, but it can return a result and throw an exception. - When you submit a
Callableto anExecutorService, it returns aFutureobject, which you can use to check if the computation is done, wait for the computation to complete, and retrieve the result of the computation. Example of using
FuturewithExecutorService:import java.util.concurrent.Callable;
import java.util.concurrent.ExecutionException;
import java.util.concurrent.ExecutorService;
import java.util.concurrent.Executors;
import java.util.concurrent.Future;
public class FutureExample {
public static void main(String[] args) {
ExecutorService executorService = Executors.newFixedThreadPool(5);
// Submits a Callable task
Future<Integer> future = executorService.submit(new Callable<Integer>() {
public Integer call() throws Exception {
// Simulates some computation
Thread.sleep(2000);
return 42;
}
});
try {
// Waits for the task to complete and gets the result
Integer result = future.get();
System.out.println("Result: " + result);
} catch (InterruptedException | ExecutionException e) {
e.printStackTrace();
}
executorService.shutdown();
}
}In the code above:
executorService.submit()is used to submit aCallable<Integer>task. TheCallabletask simulates some computation (in this case, it sleeps for 2 seconds and then returns the value 42).future.get()blocks the calling thread until the computation is completed and returns the result. If the computation throws an exception, it will be wrapped in anExecutionException.InterruptedExceptionis thrown if the waiting thread is interrupted while waiting for the result.
364. Difference future vs completableFuture
- “frequency”: 4,
When you submit a task to executor service, it returns a future.
CompletableFuture is advanced version of future.
1) It has method like thenApply, thenCombine etc. so you can build thread chain.
2) it has handle and whenComplete method, which you can handle exception with it.
在 Java 里,Future 和 CompletableFuture 都用于处理异步操作,不过 CompletableFuture 是 Java 8 引入的,它在 Future 的基础上做了扩展,功能更强大。下面从多个方面对它们进行对比,并给出示例和表格。
Future
- The
Futureinterface represents the result of an asynchronous computation. It is used in conjunction withExecutorServicewhen you submit aCallabletask. - A
Callableis similar to aRunnable, but it can return a result and throw an exception. - When you submit a
Callableto anExecutorService, it returns aFutureobject, which you can use to check if the computation is done, wait for the computation to complete, and retrieve the result of the computation. Example of using
FuturewithExecutorService:import java.util.concurrent.Callable;
import java.util.concurrent.ExecutionException;
import java.util.concurrent.ExecutorService;
import java.util.concurrent.Executors;
import java.util.concurrent.Future;
public class FutureExample {
public static void main(String[] args) {
ExecutorService executorService = Executors.newFixedThreadPool(5);
// Submits a Callable task
Future<Integer> future = executorService.submit(new Callable<Integer>() {
public Integer call() throws Exception {
// Simulates some computation
Thread.sleep(2000);
return 42;
}
});
try {
// Waits for the task to complete and gets the result
Integer result = future.get();
System.out.println("Result: " + result);
} catch (InterruptedException | ExecutionException e) {
e.printStackTrace();
}
executorService.shutdown();
}
}In the code above:
executorService.submit()is used to submit aCallable<Integer>task. TheCallabletask simulates some computation (in this case, it sleeps for 2 seconds and then returns the value 42).future.get()blocks the calling thread until the computation is completed and returns the result. If the computation throws an exception, it will be wrapped in anExecutionException.InterruptedExceptionis thrown if the waiting thread is interrupted while waiting for the result.
CompletableFuture
Enhanced Functionality:
CompletableFutureis introduced in Java 8. It implementsFutureand provides additional functionality for chaining asynchronous operations, combining multiple futures, and handling exceptions.It allows you to perform actions upon completion, combine multiple futures, and transform results.
import java.util.concurrent.CompletableFuture;
import java.util.concurrent.ExecutionException;

public class CompletableFutureExample {
    public static void main(String[] args) throws ExecutionException, InterruptedException {
        CompletableFuture<Integer> future = CompletableFuture.supplyAsync(() -> {
            // Simulate a long-running task
            try {
                Thread.sleep(2000);
            } catch (InterruptedException e) {
                e.printStackTrace();
            }
            return 42;
        });

        // Do other work while the future is being computed
        System.out.println("Doing other work...");

        // Chain another action upon completion
        CompletableFuture<String> resultFuture = future.thenApply(result -> "Result: " + result);

        // Block until the final result is available
        String result = resultFuture.get();
        System.out.println(result);
        /* result print:
            Doing other work...
            Result: 42
        */
    }
}
Explanation:
CompletableFuture.supplyAsync(() -> {... });: Creates aCompletableFuturethat runs the given task asynchronously.future.thenApply(result -> "Result: " + result);: Chains another action to theCompletableFuture.resultFuture.get();: Blocks until the final result is available.
对比分析
1. 基本功能
Future:Future代表一个异步计算的结果。它提供了检查计算是否完成、等待计算完成以及获取计算结果的方法。不过,它缺乏对异步操作的进一步控制和组合能力。CompletableFuture:CompletableFuture不仅具备Future的基本功能,还支持链式调用和组合多个异步操作,能轻松处理复杂的异步任务。
2. 异步任务的创建
Future:通常借助线程池提交任务来创建Future对象。CompletableFuture:提供了多种静态方法来创建,例如runAsync、supplyAsync等。
3. 错误处理
Future:Future本身没有内置的错误处理机制,需要手动捕获异常。CompletableFuture:有专门的exceptionally方法来处理异常,还可以使用handle方法同时处理正常结果和异常。
4. 组合多个异步任务
Future:组合多个Future任务较为复杂,需要手动管理线程和结果。CompletableFuture:提供了丰富的方法来组合多个异步任务,比如thenCompose、thenCombine等。
对比表格
| 对比项 | Future |
CompletableFuture |
|---|---|---|
| 基本功能 | 代表异步计算的结果,提供检查计算是否完成、等待计算完成以及获取结果的方法 | 具备 Future 的基本功能,还支持链式调用和组合多个异步操作 |
| 异步任务创建 | 通常通过线程池提交任务创建 | 提供多种静态方法创建,如 runAsync、supplyAsync |
| 错误处理 | 无内置错误处理机制,需手动捕获异常 | 有 exceptionally 和 handle 方法处理异常 |
| 组合多个异步任务 | 组合复杂,需手动管理线程和结果 | 提供丰富方法组合,如 thenCompose、thenCombine |
| 代码可读性 | 代码复杂,可读性差 | 支持链式调用,代码简洁易读 |
通过上述对比和示例可知,CompletableFuture 在功能和易用性上明显优于 Future,更适合处理复杂的异步任务。
69. Explain the Factory design pattern
- “frequency”: 4,
A factory is a method that if you pass an input, it can return the corresponding objects:
REAL PROJECT Example:
- Credit card payment, if enter
MasterCard, will return mastercard payment object, if enterVisa, will return visa payment etc. - Database Connection, if pass in
oracle, will return oracle connection object, if passmysql, will return mysql payment object.
Example:
MySQL |
70. What design patterns did you worked on before?
- “frequency”: 5,
Singleton, Factory + One more (You pick the 3rd one, You need to know how to explain and how to write it)
Factory Pattern
This factory pattern allows you to create objects without exposing the instantiation logic to the client. The client only needs to interact with the ProductFactory and provide the product type, and the factory takes care of creating the appropriate product. This promotes loose coupling and makes the code more modular and maintainable.
// Product interface |
Obeserver Pattern
This code demonstrates the Observer Pattern, which allows a subject to maintain a list of observers and notify them of any state changes. It promotes loose coupling between the subject and the observers, making it easy to add or remove observers without modifying the subject’s code.import java.util.ArrayList;
import java.util.List;
// Observer interface
interface Observer {
void update(String message);
}
// Subject interface
interface Subject {
void attach(Observer observer);
void detach(Observer observer);
void notifyObservers(String message);
}
// Concrete Subject
class ConcreteSubject implements Subject {
private List<Observer> observers = new ArrayList<>();
public void attach(Observer observer) {
observers.add(observer);
}
public void detach(Observer observer) {
observers.remove(observer);
}
public void notifyObservers(String message) {
for (Observer observer : observers) {
observer.update(message);
}
}
}
// Concrete Observer A
class ConcreteObserverA implements Observer {
public void update(String message) {
System.out.println("ConcreteObserverA received message: " + message);
}
}
// Concrete Observer B
class ConcreteObserverB implements Observer {
public void update(String message) {
System.out.println("ConcreteObserverB received message: " + message);
}
}
// Main class to demonstrate the Observer Pattern
public class ObserverPatternExample {
public static void main(String[] args) {
// Create subject
ConcreteSubject subject = new ConcreteSubject();
// Create observers
Observer observerA = new ConcreteObserverA();
Observer observerB = new ConcreteObserverB();
// Attach observers to the subject
subject.attach(observerA);
subject.attach(observerB);
// Notify observers
subject.notifyObservers("Hello, Observers!");
// Detach one observer
subject.detach(observerB);
// Notify remaining observer
subject.notifyObservers("Goodbye, Observers!");
}
}
Proxy Pattern
The Proxy Design Pattern is a structural design pattern that provides a surrogate or placeholder for another object to control access to it. It is used to control access to the real object, add additional functionality, or provide a more efficient way of accessing the object. Here’s a detailed explanation:
Structure of Proxy Design Pattern
- Subject: This is an interface that defines the common interface for the RealSubject and Proxy.
- RealSubject: This is the actual object that the proxy represents.
- Proxy: This is the object that controls access to the RealSubject. It has a reference to the RealSubject and implements the Subject interface.
interface Image { |
Explanation:
- Interface
Image:interface Imagedefines thedisplay()method that bothRealImageandProxyImagewill implement.
- RealSubject
RealImage:RealImageimplementsImage.- The
RealImageconstructor loads the image from disk when an instance is created. - The
display()method displays the image.
- Proxy
ProxyImage:ProxyImagealso implementsImage.ProxyImageholds a reference toRealImage.- In the
display()method ofProxyImage, ifrealImageis not instantiated, it creates aRealImageinstance. - Then, it calls the
display()method ofRealImage.
Use Cases
- Remote Proxy: Used to represent an object that exists in a different address space, like a remote object in a distributed system.
- Virtual Proxy: Used to create expensive objects on demand. For example, loading images only when they are needed to be displayed.
- Protection Proxy: Used to control access to the real object, providing authentication or authorization.
Benefits
- Lazy Loading: Objects can be loaded only when they are needed, improving performance.
- Access Control: Provides a way to control access to the real object, adding security or authorization.
- Enhanced Functionality: Proxies can add additional functionality, like logging or caching, without modifying the real object.
Example of Usage
public class ProxyPatternExample { |
Explanation:
- We create a
ProxyImageinstance with the file name “test.jpg”. - The first time
display()is called,RealImageis instantiated and the image is loaded and displayed. - The second time
display()is called, the already instantiatedRealImageis used, avoiding reloading.
71. How to custom an Exception?
- “frequency”: 4,
Just extend the Exception class
public class CustomException extends Exception { |
78. What is Optional?
- “frequency”: 4,
Optional is introduced in java 8, to prevent null pointer exception.
For example, if you have employee.getAddress().getCity(), in runtime, if employee is null, getAddress() will throw exception.
Wen can use Optional
在 Java 中,Optional 是 Java 8 引入的一个容器类,它可以包含一个非空值(Optional.of(value)),也可以表示一个空值(Optional.empty())。其主要作用是避免 NullPointerException,使代码更具可读性和健壮性。下面详细介绍 Optional 的常见用法:
1. 创建 Optional 对象
Optional.of(T value):创建一个包含非空值的Optional对象。如果传入的参数为null,会抛出NullPointerException。Optional.ofNullable(T value):创建一个可能包含空值的Optional对象。如果传入的参数为null,则返回一个空的Optional对象。Optional.empty():创建一个空的Optional对象。
import java.util.Optional; |
2. 判断 Optional 中是否包含值
isPresent():判断Optional对象是否包含非空值。如果包含非空值返回true,否则返回false。isEmpty():Java 11 引入的方法,判断Optional对象是否为空。如果为空返回true,否则返回false。
import java.util.Optional; |
3. 获取 Optional 中的值
get():如果Optional包含非空值,则返回该值;否则抛出NoSuchElementException。orElse(T other):如果Optional包含非空值,则返回该值;否则返回指定的默认值other。orElseGet(Supplier<? extends T> other):如果Optional包含非空值,则返回该值;否则调用Supplier函数式接口的get()方法获取默认值。orElseThrow():如果Optional包含非空值,则返回该值;否则抛出NoSuchElementException。在 Java 10 及以后版本,还可以使用orElseThrow(Supplier<? extends X> exceptionSupplier)方法自定义异常。
import java.util.Optional; |
4. 对 Optional 中的值进行操作
ifPresent(Consumer<? super T> action):如果Optional包含非空值,则执行指定的Consumer操作;否则不做任何处理。ifPresentOrElse(Consumer<? super T> action, Runnable emptyAction):Java 9 引入的方法,如果Optional包含非空值,则执行action;否则执行emptyAction。map(Function<? super T,? extends U> mapper):如果Optional包含非空值,则对该值应用Function函数式接口的apply()方法,并返回一个包含结果的Optional对象;否则返回一个空的Optional对象。flatMap(Function<? super T, Optional<U>> mapper):与map方法类似,但Function函数式接口的返回值必须是Optional类型。filter(Predicate<? super T> predicate):如果Optional包含非空值,并且该值满足指定的Predicate条件,则返回包含该值的Optional对象;否则返回一个空的Optional对象。
import java.util.Optional; |
通过上述示例,你可以了解到 Optional 的常见用法,合理使用 Optional 可以有效避免 NullPointerException,提高代码的健壮性和可读性。
90. ArrayList vs LinkedList, which one to choose?
- “frequency”: 4,
Structural: Arraylist has index and get(index) method. LinkedList: has only header and next pointer.
For TIME complexity,
if you know the index of target element in arraylist, arraylist is best O(1), if you dont know index, arraylist and linkedlist are the same O(n)
For Space complexity,
ADD element ArrayList is O(n) because you have to shift all elements after. But linkedlist is O(1) because you just change the pointer.
- “frequency”: 5,
Intermediate operator:
- refer to operators that return another stream which can be appended by another operator. like
stream().map(), the map is an intermediate operator because we can chain it with more operations. - Example: filter, map, sorted
Terminal operator:
- refer to final operators in stream api. We cannot append more operations after terminal operator.
- Example: forEach, collect, count, findAny
95. How do you create a thread?
- “frequency”: 4,
There are 2 ways: extend the Thread class or Implement the Runnable interface
104. How does thread communicate/interact/share data with each other
- “frequency”: 3,
Communicate/Interact:
- Wait() and Notify() method: wait() method will let current thread pause and release lock to other threads, this current thread will only be waken up and get lock if other threads call notify() or notifyAll().
- Executor service in java concurrent package can interact threads, like the WorkStealingPool use join and fork to interact between threads to improve performance. CompletableFuture also can chain threads.
If asking how to share data between threads:
- Let threads visit same data memory, like same object, same database table, same file or cache
- Use message queues. one thread sending data, another thread consume data
In Java, threads can communicate, interact, and share data with each other through several mechanisms. Here’s a detailed overview of these methods:
Shared Variables
Using Volatile Variables:
- A
volatilevariable ensures that all reads and writes to the variable are directly to and from main memory, not cached by threads. It is useful for simple flags or status indicators.public class VolatileExample {
private volatile boolean flag = false;
public void setFlag() {
flag = true;
}
public boolean getFlag() {
return flag;
}
}
- A
Explanation:
private volatile boolean flag = false;: Declares avolatileboolean variable.setFlag()sets theflagtotrue.getFlag()retrieves the value offlag.- Changes made by one thread to
flagare immediately visible to other threads.
Synchronization
Using Synchronized Methods and Blocks:
- Synchronization ensures that only one thread can access a synchronized method or block at a time, preventing race conditions.
public class SharedData {
    private int count = 0;

    public synchronized void increment() {
        count++;
    }

    public synchronized int getCount() {
        return count;
    }
}
- Synchronization ensures that only one thread can access a synchronized method or block at a time, preventing race conditions.
Explanation:
public synchronized void increment() {... }: Synchronized method ensures thread-safe access tocount.public synchronized int getCount() {... }: Ensures thread-safe access when readingcount.
Wait, Notify, and NotifyAll
Using wait(), notify(), and notifyAll():
- These methods are used in conjunction with synchronized blocks to pause and resume threads.
public class WaitNotifyExample {
    private boolean ready = false;
    private final Object lock = new Object();

    public void waitForReady() throws InterruptedException {
        synchronized (lock) {
            while (!ready) {
                lock.wait();
            }
        }
    }

    public void setReady() {
        synchronized (lock) {
            ready = true;
            lock.notifyAll();
        }
    }
}
- These methods are used in conjunction with synchronized blocks to pause and resume threads.
Explanation:
waitForReady()waits untilreadyistrue, usinglock.wait().setReady()setsreadytotrueand wakes up waiting threads usinglock.notifyAll().
Thread Confinement
Using ThreadLocal:
ThreadLocalallows each thread to have its own copy of a variable.public class ThreadLocalExample {
private static final ThreadLocal<Integer> threadLocal = new ThreadLocal<>();
public static void main(String[] args) {
threadLocal.set(1);
System.out.println(threadLocal.get());
}
}
Explanation:
ThreadLocal<Integer> threadLocal = new ThreadLocal<>();: Creates aThreadLocalvariable.threadLocal.set(1);: Sets the value for the current thread.threadLocal.get();: Retrieves the value for the current thread.
Using Concurrent Data Structures
Using Concurrent Collections:
- Java provides concurrent collections like
ConcurrentHashMap,CopyOnWriteArrayList, etc., which are thread-safe.import java.util.concurrent.ConcurrentHashMap;
public class ConcurrentMapExample {
public static void main(String[] args) {
ConcurrentHashMap<String, Integer> map = new ConcurrentHashMap<>();
map.put("key", 1);
System.out.println(map.get("key"));
}
}
- Java provides concurrent collections like
Explanation:
ConcurrentHashMap<String, Integer> map = new ConcurrentHashMap<>();: Creates a thread-safe map.map.put("key", 1);: Puts an entry in the map.map.get("key");: Retrieves the value from the map.
Using Locks and Condition Variables
Using ReentrantLock and Condition:
ReentrantLockprovides more flexible locking thansynchronized, andConditionallows more control over waiting and signaling.import java.util.concurrent.locks.Condition;
import java.util.concurrent.locks.ReentrantLock;
public class LockConditionExample {
private final ReentrantLock lock = new ReentrantLock();
private final Condition condition = lock.newCondition();
private boolean ready = false;
public void waitForReady() throws InterruptedException {
lock.lock();
try {
while (!ready) {
condition.await();
}
} finally {
lock.unlock();
}
}
public void setReady() {
lock.lock();
try {
ready = true;
condition.signalAll();
} finally {
lock.unlock();
}
}
}
Explanation:
ReentrantLock lock = new ReentrantLock();: Creates a reentrant lock.Condition condition = lock.newCondition();: Creates a condition associated with the lock.condition.await();makes the thread wait.condition.signalAll();wakes up waiting threads.
By using these mechanisms, threads can communicate, interact, and share data safely and efficiently, avoiding race conditions and ensuring thread-safe access to shared resources.
106. What are the meaning of thread methods: join, wait, sleep, yield
- “frequency”: 3,
JOIN: to let current thread wait until another thread finishes. So it is used to let threads run in order.
WAIT: wait is to RELEASE lock and let other threads run. this thread will resume only when other threads call notify(), notifyAll()
SLEEP: this thread will NOT RELEASE the lock, it lets current thread to sleep for given time and then it will restart by itself. Different from wait method, the sleep will not release lock and will resume by itself.
YIELD: if some threads share the same priority, yield method is to hold current thread and let others run first.
join() Method
Purpose: The
join()method is used to wait for a thread to complete its execution. It is often used when one thread needs to wait for another thread to finish before it can continue its own execution.public class JoinExample {
public static void main(String[] args) throws InterruptedException {
Thread thread1 = new Thread(() -> {
try {
Thread.sleep(2000);
System.out.println("Thread 1 completed");
} catch (InterruptedException e) {
e.printStackTrace();
}
});
thread1.start();
thread1.join();
System.out.println("Main thread continues after thread1 completes");
/* result print:
Thread 1 completed
Main thread continues after thread1 completes
*/
}
}- Explanation:
- We create a new
Thread(thread1) which sleeps for 2 seconds and then prints a message. - We start
thread1withthread1.start(). - We call
thread1.join(), which makes the main thread wait untilthread1completes its execution. - Only after
thread1completes, the main thread prints its message.
- We create a new
- Explanation:
wait() Method
Purpose: The
wait()method is used to make a thread wait until some other thread notifies it. It must be called from a synchronized block or method, and it releases the lock on the object.public class WaitExample {
public static void main(String[] args) {
final Object lock = new Object();
Thread thread1 = new Thread(() -> {
synchronized (lock) {
try {
System.out.println("Thread 1 is waiting");
lock.wait();
System.out.println("Thread 1 resumed");
} catch (InterruptedException e) {
e.printStackTrace();
}
}
});
Thread thread2 = new Thread(() -> {
synchronized (lock) {
System.out.println("Thread 2 notifying");
lock.notify();
}
});
thread1.start();
try {
Thread.sleep(1000);
} catch (InterruptedException e) {
e.printStackTrace();
}
thread2.start();
/* result print:
Thread 1 is waiting
Thread 2 notifying
Thread 1 resumed
*/
}
}- Explanation:
- We create an object
lockwhich serves as a lock for synchronization. thread1enters a synchronized block, callswait(), and waits.thread2enters the same synchronized block, callsnotify(), and wakes upthread1.
- We create an object
- Explanation:
sleep() Method
Purpose: The
sleep()method is used to pause the execution of a thread for a specified amount of time. The thread does not release any locks during this time.public class SleepExample {
public static void main(String[] args) {
Thread thread1 = new Thread(() -> {
try {
System.out.println("Thread 1 sleeping");
Thread.sleep(2000);
System.out.println("Thread 1 awake");
} catch (InterruptedException e) {
e.printStackTrace();
}
});
thread1.start();
/* result print:
Thread 1 sleeping
Thread 1 awake
*/
}
}- Explanation:
- We create a new
Thread(thread1). thread1callsThread.sleep(2000), which pauses the thread for 2 seconds.
- We create a new
- Explanation:
yield() Method
Purpose: The
yield()method is used to suggest to the thread scheduler that the current thread is willing to yield its current use of the processor. The thread scheduler is free to ignore this suggestion.public class YieldExample {
public static void main(String[] args) {
Thread thread1 = new Thread(() -> {
for (int i = 0; i < 5; i++) {
System.out.println("Thread 1: " + i);
Thread.yield();
}
});
Thread thread2 = new Thread(() -> {
for (int i = 0; i < 5; i++) {
System.out.println("Thread 2: " + i);
Thread.yield();
}
});
thread1.start();
thread2.start();
/* result print:
Thread 2: 0
Thread 2: 1
Thread 2: 2
Thread 1: 0
Thread 1: 1
Thread 1: 2
Thread 2: 3
Thread 2: 4
Thread 1: 3
Thread 1: 4
*/
}
}- Explanation:
- We create two threads (
thread1andthread2). - Each thread prints a message and calls
Thread.yield(), suggesting that the scheduler can give the CPU to another thread.
- We create two threads (
- Explanation:
117. What is ConcurrentModificationException and how to handle it?
- “frequency”: 4,
ConcurrentModificationException is thrown when you have multiple threads try to modify the NON-thread-safe java collections, like ArrayList, HashSet, HashMap etc.
To handle:
- When modify collection, like remove element, using Iterator instead of for loop.
- Use thread safe collection, like CopyOnWriteArrayList, ConcurrentHashMap, CopyOnWriteHashSet etc.
118. Relationship between equals() and hashcode()
- “frequency”: 3,
In HashMap, when you do a get(key) call, first key is passed to hashcode() to locate a bucket, and then inside bucket, call equals() to find the entry.
HashCode() and Equals() should use exactly the same object fields.
- If two objects are equal according to the
equals()method, they must have the same hash code (equal objects must produce equal hash codes). - However, the reverse is not necessarily true: two objects with the same hash code may or may not be equal.
In Java, the equals() method is used to compare the equality of two objects. Here’s a detailed explanation:
Default Implementation
- The
equals()method is defined in theObjectclass, which is the superclass of all classes in Java. The default implementation of
equals()uses the==operator, which checks if two references point to the same object (i.e., reference equality).public class EqualsExample {
public static void main(String[] args) {
Object obj1 = new Object();
Object obj2 = new Object();
Object obj3 = obj1;
System.out.println(obj1.equals(obj2)); // false
System.out.println(obj1.equals(obj3)); // true
}
}- Explanation:
obj1.equals(obj2)returnsfalsebecauseobj1andobj2are different object instances.obj1.equals(obj3)returnstruebecauseobj3refers to the same object asobj1.
- Explanation:
Overriding equals()
You should override the
equals()method in your custom classes if you want to compare objects based on their state (content equality) rather than reference equality.class Person {
private String name;
private int age;
public Person(String name, int age) {
this.name = name;
this.age = age;
}
public boolean equals(Object o) {
if (this == o) return true;
if (o == null || getClass()!= o.getClass()) return false;
Person person = (Person) o;
return age == person.age && name.equals(person.name);
}
}- Explanation:
if (this == o) return true;checks if the objects are the same reference.if (o == null || getClass()!= o.getClass()) return false;checks ifoisnullor not of the same class.Person person = (Person) o;castsotoPerson.return age == person.age && name.equals(person.name);compares theageandnamefields.
- Explanation:
hashCode() and equals()
- If you override
equals(), you should also overridehashCode(). The
hashCode()method is used in hash-based collections likeHashMapandHashSet.class Person {
private String name;
private int age;
public Person(String name, int age) {
this.name = name;
this.age = age;
}
public boolean equals(Object o) {
if (this == o) return true;
if (o == null || getClass()!= o.getClass()) return false;
Person person = (Person) o;
return age == person.age && name.equals(person.name);
}
public int hashCode() {
int result = name.hashCode();
result = 31 * result + age;
return result;
}
}- Explanation:
hashCode()is overridden to generate a hash code based onnameandage.- The formula
int result = name.hashCode(); result = 31 * result + age;is a common way to combine hash codes.
- Explanation:
Rules for equals()
- Reflexive:
x.equals(x)should always betrue. - Symmetric: If
x.equals(y)istrue, theny.equals(x)should also betrue. - Transitive: If
x.equals(y)istrueandy.equals(z)istrue, thenx.equals(z)should betrue. - Consistent: Repeated calls to
equals()should return the same result, if the objects have not changed. - Null Check:
x.equals(null)should always befalse.
Using equals()
public class EqualsUsage { |
- Explanation:
p1.equals(p2)returnstruebecausep1andp2have the samenameandage(because we overrode itsequalsmethod above).p1.equals(p3)returnsfalsebecausep1andp3have differentnameandage.
119. How to make class immutable?
- “frequency”: 5,
Immutable means it cannot be changed. So we should prevent all ways to change a class and its object
- make class final, public final class ..so we cannot extend and modify it
- make fields private, so we cannot modify it directly from outside
- Do NOT provide setter method.
- in the get method, don’t return fields directly, return copy of the fields.
121. What is the deadlock? How to FIND it? How to avoid it?
- “frequency”: 3,
Deadlock is when you have 2 threads, Thread1 is waiting Thread2 to release lock on an object while Thread2 is waiting for Thread1 to release lock on an object. They are waiting on each other.
To find:
use Thread dump, thread dump is like to take a snapshot/photos of all current threads, so it will show if there are deadlocks.
JProfiler/FastThread/JStack are all tools can show thread dump.
To prevent:
1) For all shared objects/resources by both threads should be combined as a whole entity and should be locked together.
2) Set global orders for the shared objects, so that threads will only lock them in same order.
Deadlock is when you have 2 threads, Thread1 is waiting Thread2 to release lock on an object while Thread2 is waiting for Thread1 to release lock on an object. They are waiting on each other.
public class ThreadLock { |
Finding Deadlocks
Thread Dump Analysis:
- You can use tools like
jstack(part of the JDK) to take a thread dump of a running Java application. A thread dump shows the state of all threads, including which locks they hold and which locks they are waiting for. Example of using
jstack:jstack <PID>
Here,
<PID>is the process ID of the Java application.- Analyzing the thread dump:
- Look for threads that are in the
BLOCKEDstate. If two or more threads are waiting on locks held by each other, it indicates a deadlock. - For example, if Thread A is waiting for a lock held by Thread B, and Thread B is waiting for a lock held by Thread A, it’s a deadlock.
- Look for threads that are in the
- You can use tools like
- Java VisualVM:
- Java VisualVM is a monitoring and profiling tool. It can detect deadlocks automatically.
- Steps:
- Start your Java application.
- Open Java VisualVM.
- Locate your application in the list of running Java processes.
- Go to the “Threads” tab.
- Look for deadlock warnings, and examine thread states and locks.
Avoiding Deadlocks
Lock Ordering:
- Always acquire locks in a consistent order across all threads.
Example:
public class DeadlockAvoidance {
    private final Object lock1 = new Object();
    private final Object lock2 = new Object();

    public void method1() {
        synchronized (lock1) {
            synchronized (lock2) {
                // Critical section
            }
        }
    }

    public void method2() {
        synchronized (lock1) {
            synchronized (lock2) {
                // Critical section
            }
        }
    }
}
Explanation:
- Both
method1()andmethod2()acquirelock1beforelock2. This ensures that no thread holdslock2while waiting forlock1.
- Both
Lock Timeout:
- Use
tryLock()with a timeout instead ofsynchronizedorlock(). Example:
import java.util.concurrent.locks.Lock;
import java.util.concurrent.locks.ReentrantLock;

public class TimeoutLockExample {
    private final Lock lock1 = new ReentrantLock();
    private final Lock lock2 = new ReentrantLock();

    public void method1() {
        boolean lock1Acquired = false;
        boolean lock2Acquired = false;
        try {
            lock1Acquired = lock1.tryLock(100, TimeUnit.MILLISECONDS);
            lock2Acquired = lock2.tryLock(100, TimeUnit.MILLISECONDS);
            if (lock1Acquired && lock2Acquired) {
                // Critical section
            }
        } catch (InterruptedException e) {
            // Handle interruption
        } finally {
            if (lock1Acquired) lock1.unlock();
            if (lock2Acquired) lock2.unlock();
        }
    }
}
Explanation:
tryLock(100, TimeUnit.MILLISECONDS)tries to acquire the lock with a timeout of 100 milliseconds.- If the lock cannot be acquired within the timeout, the thread can take corrective action.
- Use
- Avoid Nested Locks:
- Minimize the use of nested locks. If possible, design your code to use a single lock or fewer nested locks.
Best Practices
- Resource Allocation Graph:
- Use a resource allocation graph to analyze potential deadlocks before implementation.
- Ensure that the graph does not contain cycles, which indicate potential deadlocks.
- Deadlock Detection Algorithms:
- Implement deadlock detection algorithms like the Banker’s algorithm in more complex systems, especially in operating systems or resource management systems.
132. What is fail-fast and fail-safe?
- “frequency”: 3,
Fail-Fast: detects the possible failures before it happens. Like when you loop element of HashMap and try to remove it. It will fail fast with ConcurrentModificationException
Fail-safe: Use the data structure that can handle ConcurrentModificationException by itself, so it will not throw exception, like when loop and remove elements from ConcurrentHashMap.
Here’s an explanation of fail-fast and fail-safe mechanisms in Java, particularly in the context of collections:
Fail-Fast
- Concept:
- Fail-fast iterators in Java immediately throw a
ConcurrentModificationExceptionif the collection is modified structurally during iteration. Structural modifications include adding or removing elements. - It is designed to fail as soon as possible to avoid unpredictable behavior due to concurrent modifications.
- Fail-fast iterators in Java immediately throw a
Example of Fail-Fast Iterator:
import java.util.ArrayList;
import java.util.Iterator;
import java.util.List;
import java.util.ConcurrentModificationException;

public class test {
    public static void main(String[] args) {
        List<String> list = new ArrayList<>();
        list.add("A");
        list.add("B");
        list.add("C");

        try {
            Iterator<String> iterator = list.iterator();
            while (iterator.hasNext()) {
                String element = iterator.next();
                if (element.equals("A")) {
                    // Structural modification
                    list.remove(element);
                    /*
                    the correct way!! When we want to remove an element, we use iterator.remove() instead of list.remove(element). This is the correct way to remove elements while iterating through the list, as the iterator's remove() method is designed to handle the modification safely, updating the internal state of the iterator and avoiding ConcurrentModificationException.
                    */
                }
            }
        } catch (ConcurrentModificationException e) {
            System.out.println("ConcurrentModificationException caught: " + e.getMessage());
        }
        /* result print:
            ConcurrentModificationException caught: null
        */
    }
}- Explanation:
- We create an
ArrayListand add elements “A”, “B”, and “C”. - We obtain an iterator using
list.iterator(). - While iterating, we attempt to remove an element using
list.remove(element). - This results in a
ConcurrentModificationExceptionbecause the collection is modified during iteration.
- We create an
- Explanation:
Fail-Safe
- Concept:
- Fail-safe iterators in Java do not throw
ConcurrentModificationExceptionwhen the collection is modified structurally during iteration. - They operate on a copy of the collection, not the original collection, so changes to the original collection do not affect the iteration.
- Fail-safe iterators in Java do not throw
Example of Fail-Safe Iterator:
import java.util.concurrent.CopyOnWriteArrayList;

public class FailSafeExample {
        public static void main(String[] args) {
                CopyOnWriteArrayList<String> list = new CopyOnWriteArrayList<>();
                list.add("A");
                list.add("B");
                list.add("C");

                Iterator<String> iterator = list.iterator();
                while (iterator.hasNext()) {
                        String element = iterator.next();
                        if (element.equals("B")) {
                                // Structural modification
                                list.remove(element);
                        }
                }
        }
}- Explanation:
- We create a
CopyOnWriteArrayList. - We add elements “A”, “B”, and “C”.
- We obtain an iterator using
list.iterator(). - We attempt to remove an element using
list.remove(element)during iteration. - No
ConcurrentModificationExceptionis thrown becauseCopyOnWriteArrayListuses a fail-safe iterator that works on a copy of the list.
- We create a
- Explanation:
135. Map vs. FlatMap
- “frequency”: 4,
In Java 8 stream api.
Map is to convert data, it takes a function as input.
List<String> list2 = Arrays.asList("Pencil", "Pencil", "Note", "Pen", "Book", "Pencil", "Book"); |
FlatMap is Map + Flat. It can handle 2 dimensional matrix, and apply Map on each row and then Flat each row result into a final 1 dimensional array.
List<List<String>> list3 = Arrays.asList( |
In functional programming, Map and FlatMap are two commonly used higher-order functions, especially in languages like Java, Scala, Python, and JavaScript. Here’s a detailed explanation of both:
Map
Purpose: The
Mapfunction takes a function and applies it to each element of a collection, transforming each element into a new element. The result is a collection of the same size, where each element has been transformed by the function.import java.util.Arrays;
import java.util.List;
import java.util.stream.Collectors;
public class MapExample {
public static void main(String[] args) {
List<Integer> numbers = Arrays.asList(1, 2, 3, 4, 5);
// Map each integer to its square
List<Integer> squaredNumbers = numbers.stream()
.map(n -> n * n)
.collect(Collectors.toList());
System.out.println(squaredNumbers); // [1, 4, 9, 16, 25]
}
}- Explanation:
- We have a list of integers
numbers. - We use the
stream()method to convert the list into a stream. - The
map()function takes a lambda expressionn -> n * n, which squares each element. - The
collect(Collectors.toList())method collects the transformed elements back into a list.
- We have a list of integers
- Explanation:
FlatMap
Purpose: The
FlatMapfunction takes a function that returns a collection for each element in the original collection. It then flattens all these collections into a single collection. It is used when you have a collection of collections and want to transform them into a single collection.import java.util.Arrays;
import java.util.List;
import java.util.stream.Collectors;
public class FlatMapExample {
public static void main(String[] args) {
List<List<Integer>> numberLists = Arrays.asList(
Arrays.asList(1, 2),
Arrays.asList(3, 4),
Arrays.asList(5, 6)
);
// FlatMap to convert a list of lists into a single list
List<Integer> flattenedNumbers = numberLists.stream()
.flatMap(list -> list.stream())
.collect(Collectors.toList());
System.out.println(flattenedNumbers); // [1, 2, 3, 4, 5, 6]
}
}- Explanation:
- We have a list of lists of integers
numberLists. - We use
stream()to convert the list of lists into a stream. - The
flatMap()function takes a lambda expressionlist -> list.stream(), which converts each inner list into a stream. - The
flatMap()function then flattens all these streams into a single stream. - Finally,
collect(Collectors.toList())collects the elements from the flattened stream into a single list.
- We have a list of lists of integers
- Explanation:
163. what is SOLID principle
The SOLID principles are a set of five design principles in object - oriented programming and software design. These principles help in creating more maintainable, flexible, and understandable software systems. Here’s a detailed look at each of them:
- Single Responsibility Principle (SRP)
- Definition: A class should have only one reason to change. In other words, a class should have only one job or responsibility.
- Example: Consider a class that is responsible for calculating the area of different geometric shapes (like circles, rectangles, etc.) and also responsible for saving the calculated results to a database. This violates the SRP. A better design would be to have one class for calculating the areas and another class for handling the database operations.
- Benefits: It makes the classes more focused and easier to understand and maintain. When a change is required related to a particular responsibility (say, a change in the area - calculation formula), it’s clear which class needs to be modified and other classes are not affected.
- Open - Closed Principle (OCP)
- Definition: Software entities (classes, modules, functions, etc.) should be open for extension but closed for modification.
- Example: Let’s say you have a drawing application that can draw different shapes. Initially, it can draw circles and rectangles. If you want to add a new shape like a triangle, you should be able to do it without modifying the existing drawing code for circles and rectangles. This can be achieved through inheritance or interfaces. For instance, you can have an abstract
Shapeclass with adraw()method, and concrete classes forCircle,Rectangle, andTrianglethat implement thedraw()method. - Benefits: It allows for easy addition of new functionality without the risk of breaking the existing code that has already been tested and is working. This leads to more stable and maintainable software over time.
- Liskov Substitution Principle (LSP)
- Definition: Subtypes must be substitutable for their base types. In other words, if you have a program that is using a base class, you should be able to substitute a derived class in its place without changing the correctness of the program.
- Example: Consider a base class
Vehiclewith a methodstartEngine(). A subclassCarinherits fromVehicle. If theCarclass redefines thestartEngine()method in such a way that it violates the expected behavior (for example, thestartEngine()method in theCarclass throws an exception every time it’s called, while in theVehicleclass it starts the engine successfully most of the time), then it violates the LSP. - Benefits: It ensures that the inheritance hierarchy is used in a way that is consistent with the expected behavior. This helps in building more reliable and understandable object - oriented hierarchies.
- Interface Segregation Principle (ISP)
- Definition: Clients should not be forced to depend on interfaces they do not use. Instead of having a large, monolithic interface, it’s better to have smaller, more specific interfaces.
- Example: Suppose you have an interface
Workerthat has methods likework(),takeBreak(),attendMeeting(), anddoPaperwork(). Now, consider a classManualLaborerthat only needs to implement thework()method and doesn’t need to deal withdoPaperwork()etc. Having a singleWorkerinterface forces theManualLaborerclass to implement methods it doesn’t need. A better approach would be to split theWorkerinterface into smaller interfaces likePhysicalWorker(withwork()method) andOfficeWorker(withdoPaperwork(),attendMeeting()etc.) - Benefits: It reduces the coupling between different parts of the system. Classes only need to implement the interfaces that are relevant to them, which makes the code more modular and easier to understand and maintain.
- Dependency Inversion Principle (DIP)
- Definition:
High-levelmodules should not depend onlow-levelmodules. Both should depend on abstractions. Abstractions should not depend on details. Details should depend on abstractions. - Example: Consider a
high-levelmodule like aUserControllerin a web application that depends on alow-levelmodule like aUserRepositorywhich is responsible for database operations. Instead of theUserControllerdirectly depending on theUserRepository, they both can depend on an abstraction like anIUserRepositoryinterface. TheUserRepositoryclass implements this interface, and theUserControlleruses the methods defined in the interface. This way, if you want to change the way user data is stored (say, from a SQL database to a NoSQL database), you only need to change the implementation of theIUserRepositoryinterface, and theUserControllerremains unaffected. - Benefits: It makes the code more flexible and easier to test. By depending on abstractions, different implementations can be swapped in and out without major changes to the
high-levelmodules.
- Definition:
139. why using static and why not?
- “frequency”: 3,
What: static is a keyword to make sure there is only 1 copy of the resource. like static field, static method or static inner class
For What: static resources can be shared across whole applications, like use static block so initalize some global data. Static method can be used as helper or util methods, we can just call Class.StaticMethod so we dont need to create instances.
Why Not: Static object will not be garbage collected. They will stay in memory forever. Too many static objects can cause memory leak.
296. Difference: Synchronized, ThreadLocal, Volatile, AtomicInteger
- “frequency”: 5,
Synchronized: it is to make resource thread safe in multi-threading environments, can be used on block of code OR method. If we have Employee object and it contains another address object and updateEmployee() method. If we put synchronized on the method, it will lock the whole employee object. If we use synchronized(address) in the code, it will only lock the address field, will not lock whole employee object, So the synchronized block has better performance.
ThreadLocal: If a variable is defined as ThreadLocal, then when a thread gets this variable, it will gets its own copy, so when this thread update this variable, it only updates its own copy, the other copies used by other threads will not be affected.
Volatile: If a variable is volatile, it is kept at a core main memory. All threads will only read and update this main copy. They will not have their own copy. All threas share exactly the same main copy. It guarantees that if one thread updates the value, the other threads will get that updated value because there is only 1 copy.
AtomicInteger: AtomicInteger/AtomicBoolean/AtomicReference etc: the ‘atomic’ is to make sure the operations on the variable is a single operation and cannot be splitted further. It is typically used as a Global Counting and prevent thread race conditions.
volatile
在Java中,volatile是一个关键字,用于修饰变量,它主要有以下作用和含义:
保证可见性
- 可见性是指当一个线程修改了共享变量的值,其他线程能够立即得知这个修改。在没有
volatile关键字修饰的情况下,线程可能会从自己的本地缓存中读取变量的值,而不是从主内存中获取最新的值,这就可能导致数据不一致的问题。 - 当变量被声明为
volatile时,任何线程对该变量的写操作都会立即刷新到主内存中,而其他线程在读取该变量时,也会强制从主内存中获取最新的值,从而保证了不同线程之间对该变量的可见性。例如:
public class VolatileExample { |
在上述代码中,flag变量被volatile修饰,当一个线程调用setFlag方法修改flag的值为true时,其他线程调用checkFlag方法能够立即获取到flag的最新值。
禁止指令重排序
- 指令重排序是指编译器和处理器为了优化程序性能,可能会对指令进行重新排序,但是这种重排序可能会导致程序的执行结果与预期不符。
volatile关键字可以禁止指令重排序,保证变量的读写操作按照代码中的顺序执行。例如,在单例模式的双重检查锁定(DCL)实现中,如果不使用volatile修饰单例对象,可能会出现问题:
public class Singleton { |
在上述代码中,instance变量被volatile修饰,这可以确保在创建单例对象时,不会因为指令重排序而导致其他线程获取到未完全初始化的对象。
需要注意的是,volatile关键字并不能保证原子性。如果需要保证原子性,通常可以使用java.util.concurrent.atomic包下的原子类,或者使用synchronized关键字来实现。
303. How does string works? Why is String immutable in Java?
- “frequency”: 5,
String is immutable in java, means once you create a string object, you cannot change it anymore. If you want to use mutable string, use StringBuilder instead.
How string memory works:
String s1 = "abc"; |
In memory, there is a constant pool which only stores the quoted string, like abc, it will not have duplicates in this constant pool.
So when we create s1, it goes to constant pool.
S2 is created by new String() constructor, whenever we call this constructore, we create a separate copy in the heap memory, not in the constant pool.
For intern() method, it will check if the constant pool has a copy, it will use it, if not, it will create one copy in the constant pool,.
So s1 == s3 == s5 != s2 != s4
Why is string immutable:
- So we can use it in many places, like as Map key.
- We can use it for security reasons, like store passwords or keys
- It will be thread safe, multi-thread cannot change the value.
- We can use for caching and hashing.. like as the Cache key or used in other APIs.
330. New features in java 11 and 17
- “frequency”: 3,
Java 11
- Local variable in lambda expression. Now you can use var to define local variables in java 11.
- New Garbage Collector: like Epsilon (for testing) and ZGC for low-latency and large heap system.
Java 17:
Sealed Class: Use
sealedkeyword to control which class can be subclass of this class. Usepermitskeyword to allow subclass.sealed class Shape permits Circle, Rectangle, Triangle {
// Common methods and properties for all subclasses
abstract double calculateArea();
}
Hidden Class: which can not be seen by java reflection.
- Text Blocks: allow you to use text like long strings.
331. What’s Garbage collection types and What’s new about GC in java 8
Reference: https://zhuanlan.zhihu.com/p/25539690
What are Java Generations in memory? (Young, Old, etc.)
JVM heap has Young Generation (Eden + Survivor), Old Generation, and Metaspace. Young Gen collects short-lived objects, Old Gen holds long-lived ones.
- What is PermGen? What replaced it and why?
- PermGen was a memory pool for class metadata, fixed in size. It was replaced by Metaspace in Java 8 for dynamic growth and fewer memory issues.
- What is Metaspace? How is it better?
- Metaspace stores class metadata in native memory, growing automatically as needed. It avoids OutOfMemory errors common in PermGen.
- important GC:
- ZGC
- G1GC (java 17 default GC)
- What is ZGC in Java 11? What are its benefits?
- ZGC is a scalable, low-latency garbage collector with sub-10ms pause times. It supports large heaps (up to TBs) and does most work concurrently.
- Java allows you to choose different GC algorithms based on your JVM version. Common GC options include -XX:+UseSerialGC, -XX:+UseParallelGC, -XX:+UseConcMarkSweepGC, and -XX:+UseG1GC.
Metaspace vs. Permanent Generation
| Comparison Aspect | Permanent Generation | Metaspace |
|---|---|---|
| Definition | It was a space in the Java Virtual Machine (JVM) heap used to store class metadata, such as class definitions, method byte - code, and constant pool information. | It is a native memory area in the JVM that serves the same purpose as the Permanent Generation, storing class metadata. |
| Memory Management | The size of the Permanent Generation was fixed, and it was part of the heap. If the space was exhausted, a java.lang.OutOfMemoryError: PermGen space error would occur. |
Metaspace uses native memory, and its size can be adjusted dynamically. By default, it can grow as needed, reducing the likelihood of out - of - memory errors due to insufficient metadata space. |
| Configuration | Its size was configured using parameters like -XX:PermSize and -XX:MaxPermSize. |
You can configure Metaspace using parameters such as -XX:MetaspaceSize (the initial size) and -XX:MaxMetaspaceSize (the maximum size). |
| Introduced in | Present in Java 7 and earlier versions. | Introduced in Java 8 to replace the Permanent Generation. |
ZGC vs. G1GC
| Comparison Aspect | ZGC | G1GC |
|---|---|---|
| Goal | Designed to achieve extremely low pause times (sub - millisecond pauses) even for very large heaps (multi - terabyte heaps). | Aims to balance between throughput and pause times, suitable for medium - to large - sized heaps. |
| Heap Layout | Uses a region - based and page - based heap layout. It divides the heap into small, fixed - size regions. | Also uses a region - based heap layout. It divides the heap into multiple regions of equal size. |
| Pause Time | Offers very short and predictable pause times, regardless of the heap size. Pauses are mostly in the sub - millisecond range. | Can have longer pause times compared to ZGC, especially for very large heaps. However, it can control pause times to some extent using the -XX:MaxGCPauseMillis parameter. |
| Throughput | Generally has lower throughput compared to G1GC, especially for smaller heaps. This is because it spends more time on concurrent operations to achieve low pause times. | Can provide relatively high throughput, especially when configured correctly for the application’s workload. |
| Application Scenarios | Ideal for applications with large heaps and strict low - latency requirements, such as financial trading systems and real - time analytics platforms. | Suitable for a wide range of applications, especially those that need a balance between throughput and pause times, like enterprise - level Java applications. |
| Introduced in | Introduced in Java 11 as an experimental feature and became production - ready in later versions. | Introduced in Java 7 as a replacement for the Concurrent Mark Sweep (CMS) collector. |
343. Suppose when you have Employee class to store data, when do you use list or map
- “frequency”: 2,
1) List can have duplicates and it is just to store all information. Map is key value pair, key must be unique
2) In application, if you just want to show all employees in json format, you can use list; but if you want to show list of employee Ids and if you click the Ids it will display the whole employee json, so it is like you need a id –> employee association, then you can use map.
344. Difference: Arraylist vs LinkedList, when to use which
- “frequency”: 5,
READ:
- ArrayList: is usually faster because it has index. It can be O(1), or worst O(n) if you dont know index
- LinkedList: is slower because you have to traverse from header, so it is always O(n)
ADD/REMOVE
- ArrayList: is usually slower because when you add element, you have to shift all elements after it. So it is O(n)
- LinkedList: is faster because you just change the pointer, O(1)
INTERNAL IMPLEMENTATION:
- ArrayList: implemented by dynamic Array, Need less space because it only need to store value and index
- Linkedlist: double linkedlist, with value and pointers. Need more space to store, value, left and right pointer
WHICH ONE:
- If your app need more READ, less ADD/REMOVE, then linkedlist is good
USE CASE:
- ArrayList: for example to store a list of objects
- Linkedlist: to store object where you just need previous or next value, like browser history or stack.
363. Callable vs Runnable
| Feature | Runnable | Callable |
|---|---|---|
| Introduced In | Java 1.0 | Java 1.5 (as part of java.util.concurrent) |
| Return Value | Cannot return a result (void run()) |
Returns a result (V call() throws Exception) |
| Can Throw Exceptions | Cannot throw checked exceptions | Can throw checked exceptions |
| Used With | Thread, Executor |
ExecutorService.submit() |
| Result Retrieval | No result | Returns a Future<V> |
| Lambda Support | Yes (since Java 8) | Yes (since Java 8) |
| Common Use Case | Fire-and-forget tasks | Tasks needing a result or exception handling |
Using Runnable:
Runnable task = () -> System.out.println("Running a Runnable"); |
Using Callable:
Callable<String> task = () -> "Result from Callable"; |
When to Use Which:
- Use
Runnablefor simple background tasks with no result or exception propagation. - Use
Callablewhen you need to return a result or handle exceptions.
371. JDK vs JRE vs JVM
- “frequency”: 2,
JDK is for developer to write java code, it can compile the java code to binary class code and also it has debug mode.
JRE is a java running environment, if you want to run java application, you have to have JRE installed.
JVM: java virtual machine, is to mange java memory, like heap, stack, metaspace etc.
373. How do you implement a deadlock
- “frequency”: 4,
public class ThreadLock { |
374. Synchronized method vs Synchronized block
- “frequency”: 3,
public class UserService{ |
detailed explanation:
Synchronized Method
public class SynchronizedMethodExample {
    private int count = 0;

    public synchronized void increment() {
        count++;
    }
}- Explanation:
- The
synchronizedkeyword is applied directly to the method signature. - When a thread calls
increment(), it acquires the lock on the object instance (this) of the class. - No other thread can execute any other synchronized method of the same object until the first thread completes the execution of the synchronized method.
- It’s a simple way to ensure thread safety but can lead to performance issues if the method contains non-critical code that doesn’t need synchronization.
- The
- Explanation:
Synchronized Block
public class SynchronizedBlockExample {
    private int count = 0;
    private final Object lock = new Object();

    public void increment() {
        synchronized (lock) {
            count++;
        }
    }
}- Explanation:
- A synchronized block is used within a method.
- The
synchronized (lock)statement takes an object (in this case,lock) as an argument. This object serves as the lock. - Only one thread can enter the synchronized block that uses the same
lockobject at a time. - This allows for more granular control over what part of the method is synchronized, which can improve performance by limiting the scope of synchronization to only the critical section.
- Explanation:
- Key Differences
- Scope of Synchronization:
- Synchronized Method: The entire method is synchronized, even if not all code within the method requires synchronization.
- Synchronized Block: Only the code within the synchronized block is synchronized, allowing other parts of the method to be executed concurrently by different threads.
- Lock Object:
- Synchronized Method: The lock object is the instance of the class itself (this) for instance methods, or the class object for static methods.
- Synchronized Block: You can specify any object as the lock, giving you flexibility in choosing the granularity of locking.
- Performance:
- Synchronized Method: May lead to unnecessary locking and reduced performance if the method contains code that does not need to be synchronized.
- Synchronized Block: Allows for more efficient locking by only synchronizing the necessary parts of the code.
- Scope of Synchronization:
- Best Practices
- Use Synchronized Method: When the entire method needs to be thread-safe and the method is relatively small.
- Use Synchronized Block: When only a part of the method needs to be synchronized, especially in longer methods where only a small part accesses shared resources.
454. What is Java 17 new feature - sealed class?
- “frequency”: 5,
Java sealed class defines who can extend this class, so it adds more restrictions on class inheritance.
Key things:
- it uses
sealedandpermitsto define who can extend this sealed class - the permitted children classes HAVE TO be in the same package as parent class
- Children classes MUST be decorated with one of three keywords: sealed, non-sealed, final..
- the sealed child class can be further extended by permitted children
- the non-sealed child class can be extended by another class
- the final child class cannot be extended by any children class
public sealed class Vehicle permits Truck, Sedan, SUV {…} |
455. What is difference between synchronized and ReentrantLock?
- “frequency”: 4,
Java has two types of locks, implicit and explicit. Synchronized is implicit lock which java controls everything, as a developer, we just add synchronized keyword. ReentrantLock is explicit lock which we have more control on the locked object.
Things we can do with ReentrantLock:
- TryLock – a thread can try lock object, if it returns true, it will acquire lock, otherwise, it will keep waiting
- Fair Lock – if there are many threads waiting, for Fair lock, the longest waiting thread will get the lock, FIFO order. ReentrantLock rl = new ReentrantLock(true);
- Lock Interrupt – thread can try to interrupt the lock
- access count – It can count how many times a thread has gain access. Count can increase and decrease, when it decrease to 0 means the thread unlocked the object.
class Test |
448. What is proxy design pattern
- The Proxy Design Pattern is a structural design pattern that provides a surrogate or placeholder for another object to control access to it.
- usage: It is used to control access to the real object, add additional functionality, or provide a more efficient way of accessing the object. Here’s a detailed explanation:
- Subject: This is an interface that defines the common interface for the RealSubject and Proxy.
- RealSubject: This is the actual object that the proxy represents.
- Proxy: This is the object that controls access to the RealSubject. It has a reference to the RealSubject and implements the Subject interface.
interface Image { |
Explanation:
- Interface
Image:interface Imagedefines thedisplay()method that bothRealImageandProxyImagewill implement.
- RealSubject
RealImage:RealImageimplementsImage.- The
RealImageconstructor loads the image from disk when an instance is created. - The
display()method displays the image.
- Proxy
ProxyImage:ProxyImagealso implementsImage.ProxyImageholds a reference toRealImage.- In the
display()method ofProxyImage, ifrealImageis not instantiated, it creates aRealImageinstance. - Then, it calls the
display()method ofRealImage.
Kafka
143. Did you use Kafka in your project? How does it work?
- “frequency”: 5,
Kafka has 3 parts, Producer, Cluster/Broker, Consumer (!DO NOT READ AS CUSTOMER!)
Producer send message (has topic) to broker
Broker has topics, each topic has several partitions, the messages are send to these partitions.
Consumer belongs to one consumer group, they will read the message from partition.
149. Talk about Kafka and Zookeeper
- “frequency”: 3,
In Early version of Kafka, Zookeeper is like manager, it managers the metadata, like which broker is the leader and the offset tracking.
In new Kafka version, it uses Raft consensus algorithm for leader election. So it does not need Zookeeper.
334. How to prevent data loss in kafka
- “frequency”: 5,
There are 3 parts of Kafka, all 3 parts need to prevent data loss.
Producer: when producer sends message to broker, the broker will send a status back to producer if the message is received, if not received, producer will keep sending the same message again and again.
Broker: Each partition has K replications/backups, there is a parameter ACKS (acknowledgement), ACKS = 0 means broker will not tell if the message is received, so if there broker is down, then it is lost. ACKS = 1 means if the message is received by leader partition, but not yet received by replications, it will tell producer the message is received, so when ACKS = 1 and the leader broker is down, the message will be lost. ACKS = ALL means only when all replications of partitions receive the message and then the producer will be notified. ACKS = 0/1 could cause message loss, but ACKS = ALL will slow down performance.
Consumer: enable.auto.commit is a configuration that let consumer auto commit the offset, once auto commit, the message is considered read by consumer successfully. But if the consumer has some error, it may cause the read failure. so we can set enable.auto.commit = false and manually commit the offset.
335. How to keep message order in Kafka
- “frequency”: 5,
Key: message in one partition is consumed in order. So to make message in order, we just need to send them to same partition. In kafka, each message has an id, if you don’t give id, kafka will assign auto generated id, Kafka use hashing to convert this id to hashcode which is corresponding the partition. (just like hashmap hashcode and bucket). So to make message in order, we need to assign same message ID to them, like if it is order message, we can use order id, if it is like transaction messages, we can use transaction id.
336. How to prevent duplicate message in kafka
- “frequency”: 5,
Kafka has consumer and producer. To prevent duplicate, we should try on both side [reference]
Producer:
- Kakfa has many producers and each producer can send many messages, to make each message unique, we need to assign producer an ID and each message an ID, so the producer ID + message ID combination will be unique.
Consumer:
- enable.auto.commit should be set to false. enable.auto.commit = true means kafka will auto commit the offset even if consumer failed to process the message, this could cause message loss.
- Consumer has 2 ways to prevent duplicate messages, 1) it can check the message unique id, if found that id is already processed, it will ignore it. 2) it can make its opreation idempotent, just like put, update once and twice will yield same results.
One more thing, if each message is sent only once, but the consumer is down, then we could have message lost, so we need to configure auto.offset.reset, this is a parameter to decide when consumer is down, whether we should restart reading from last failed position (latest - default) or beginning of the partition (earliest).
345. Kafka how to let two consumers read the same message
- “frequency”: 2,
Put them in different consumer group.
In kafka, consumers in same group can only read different partitions - that is why the number of consumers cannot be more than number of partitions in each group. But consumer in different group can read the same partition.
359. How to implement security to kafka. Kafka Security
- “frequency”: 4,
- Broker authentication: Add authentication for kafka broker, only authenticated applications can connect to kafka brokers.
- We can use SASL (Simple authentication and security layer) to implement it, SASL supports secure authenticaiton like PLAIN, SCRAM. SASL is a tool to add security to many network protocols, like LDAP, SMTP, IMAP etc.
- Data Encryption: Add encryption to broker so that data sent in and out of kafka brokers are encrypted.
- We can use SSL/TLS to encrypt data. To add SSL certificate to kafka. We can first use openSSL to create a certificate and then use keytool to create a truststore and add the certificate to it. We also need to configure kafka to use the SSL certificate like security.portocol=SSL
- Maintain a Access Control List (ACL) to specify which user or group can access which topic or partition.
450. What is kafka dead letter queue and how do you handle it?
“frequency”: 4,
A Kafka dead - letter queue (DLQ) is a special topic in a Kafka cluster that is used to store messages that cannot be successfully processed for some reason. Here’s an overview of what it is and how to handle it:
- Purpose: The main purpose of a DLQ is to prevent messages from being lost when they encounter processing failures. Instead of discarding the messages, they are sent to the DLQ for further analysis and possible re - processing.
- How Messages End Up in the DLQ: Messages can end up in the DLQ due to various reasons, such as application - level errors (e.g., incorrect message format, missing required fields), network issues, or problems with the processing logic. When a consumer fails to process a message after a certain number of retries, the message is typically redirected to the DLQ.
- Monitoring and Analysis:
- Monitor DLQ Size: Regularly check the size of the DLQ to identify any unusual spikes. A growing DLQ may indicate a problem with the message processing pipeline.
- Inspect Messages: Examine the messages in the DLQ to determine the cause of the processing failures. This can involve looking at the message payload, headers, and any error messages associated with the failed processing attempts.
- Error Resolution:
- Fix Application Bugs: If the errors are due to bugs in the consumer application, fix the code and redeploy the application.
- Data Correction: If the messages in the DLQ contain incorrect data, correct the data either manually or through an automated process.
- Message Re - processing:
- Manual Re - processing: For critical or complex messages, you may choose to re - process them manually. This allows for careful inspection and ensures that the processing is done correctly.
- Automated Re - processing: Set up a mechanism to automatically re - process messages from the DLQ. This can be a separate consumer that reads from the DLQ and attempts to process the messages again, perhaps with some additional error - handling logic.
- Configuration and Tuning:
- Retry Policies: Review and adjust the retry policies for your consumers. Determine the appropriate number of retries and the delay between retries based on the nature of your application and the expected failure scenarios.
- DLQ Topic Configuration: Configure the DLQ topic with appropriate settings, such as retention policies and replication factors. Ensure that the DLQ has enough storage to handle the potentially large number of messages.
- Handling a Kafka dead - letter queue effectively requires a combination of monitoring, error resolution, message re - processing, and proper configuration to ensure the reliability and integrity of the message processing system.
MicroService
152. How to use the Zuul Gateway API? / How does the Zuul Gateway API work?
- “frequency”: 4,
Zuul API Gateway is to distribute the traffic to a particular service.
For example, Amazon has 3 services, order service is at localhost:8070, payment service is at localhost:8080, delivery service is at localhost: 8090. You don’t want to expose all 3 different addresses to customers. So you add one API Gateway like at localhost:9000. Customers only access to API Gateway. API will redirect to different services based on the URL. For example, localhost:9000/order will be redirected to order service, localhost:9000/payment will be redirected to payment service, localhost:9000/delivery will be redirected to delivery service.
To set API Gateway, we need Zuul gateway server, all the other services should register the zuul gateway server in their application.properties.
153. How to manage the entire transaction across different microservices? How to rollback?
- “frequency”: 5,
Saga Pattern
Saga Orchestration Pattern is a design pattern to manage global transaction across multiple microservices based on message queue.
For example, if you make one order which involves Order Service, Payment Service and Delivery Service as one transaction. In saga orchestration pattern, you will need one command center service, like Command Service which works as a communication center for all the services.
When order service is completed, it sends a completion message to command center, the command center received and send a message to payment service, the payment service will process payment and send complete message to command service, the command service received payment completion message and send message to delivery service and once delivery is done, it tells command service and command service will mark the entire transaction as completed.
When there is error, the transaction will be rolled back in reverse order. For example, if delivery service failed, it sends failure message to command service, the command service will tell payment service to rollback payments, once payment service completes the rollback and tells the command service, the command service will ask the order service to rollback. It goes this way until the entire transaction is rolled back.
191. How to communicate between microservices
- “frequency”: 5,
There are two ways to communicate between services, sync and async
- Sync: RestTemplate/RestClient/
FeignClient– when service 1 call rest api of service 2, service 1 will have wait for the return from service 2, so this is sync communication. - Async: message queue like
Kafka,RabbitMQ– service 1 as producer sends message to kafka cluster, service 2 as consumer subscribes from kakfa cluster.
157. Suppose you have two Eureka servers, how does each application know which Eureka server it is registered to?
- “frequency”: 0,
Every application doesn’t register only to a single Eureka server. It registers with all the servers that are configured. And these servers replicate data between each other. You can check the logs, look at the Eureka dashboards, or query the registration status in your code to find out which server the app initially registered with.
158. What is the circuit breaker?
- “frequency”: 0,
A circuit breaker is a design pattern used in distributed systems to handle failures gracefully and prevent cascading failures. It’s a kind of protection. When a service is failing, it stops requests to that service for a while, giving the service time to fix itself. and it usually has three status, like 1. Closed: Requests go as usual, but we watch for failures. If too many failures happen, it turns to Open.2. Open: Requests don’t even try the service and just fail right away. After a break, it changes to Half - Open. 3. Half - Open: We let a few test requests through. If they work, it goes back to Closed. If not, it stays Open.
159. How does microservices communicate with each other?
- “answer”: null,
- “frequency”: 0,
Database
237. Ways to connect to database
- “frequency”: 4,
- JDBC - the basic way to connect to database, use statement/preparedStatement/callableStatement to run SQL direclty, use RestSet to host data. JDBC is the core for all other connections
- Hibernate - ORM framework. Use ORM so you dont need to write statement, SQL and ResultSet. Use Session and SessionFactory to do CRUD. Has 3 types of cache.
- Spring Data JPA - build on top of Java JPA. Use ORM framework as internal mapping tools and Use Naming Convention to do CRUD.
352. How do you decide which database to choose, SQL or NoSQL
- “frequency”: 0,
Several Main difference
- SQL: only have pre-defined structure schema/data, it is table based.
- NOSQL: unstructure data, like MongoDB can store PDF/audio/video/text/json data easily. Cassandra is column based, you can easily expand the columns
- SQL: based on ACID rules, designed to handle transactions.
- NOSQL: based on CAP theorem, not good for transactions.
- SQL: traditional database with SQL, not designed for big data
- NOSQL: designed for big data, have partitions.
290. Explain CAP theorem and which database use them
- “answer”:
- The CAP theorem, also known as Brewer’s theorem, is a key concept in distributed systems. It says that in a distributed system, it’s impossible to have all three of the following qualities at the same time:
- Consistency: All nodes in the system see the same data at the same time. In a consistent system, a read operation will always return the most recent write.
- Availability: Every request received by a non - failed node in the system must get a response. The system is always available to handle requests, even when there are failures.
- Partition tolerance: The system can still work even if there are network partitions. Network partitions happen when the network is split into parts that can’t talk to each other.
- In practice, distributed systems have to make choices between these three qualities. Different databases make different choices based on their design goals and what the applications they serve need.
- For MySQL, it aims to provide high consistency and availability. It uses techniques like data replication and a shared - nothing architecture to achieve these. But when there are network partitions, it may have to make some trade - offs between availability and consistency, depending on how it’s set up and the specific failure situation. In general, MySQL leans more towards consistency and availability, sacrificing some partition tolerance.
- MongoDB is a NoSQL database that focuses on high availability and partition tolerance. It can handle a large amount of data across multiple nodes in a distributed environment. It replicates data across nodes to ensure availability and can continue to operate even when there are network partitions. However, it sacrifices strong consistency. The data may not be exactly the same across all nodes at the same time, but it provides eventual consistency, which means that over time, the data will become consistent.
- Redis is an in - memory data store that is often used for caching and real - time applications. It emphasizes high availability and consistency. It usually runs on a single node or in a cluster with replication for high availability. It provides strong consistency for operations within a single node. But in a distributed setup, if there are network issues, it may face challenges in maintaining all three CAP properties. It sacrifices partition tolerance to some extent to ensure consistency and availability for typical use cases.
- In summary, different databases make different trade - offs based on the CAP theorem to meet the specific needs of different applications.
- The CAP theorem, also known as Brewer’s theorem, is a key concept in distributed systems. It says that in a distributed system, it’s impossible to have all three of the following qualities at the same time:
“frequency”: 0,
376. What is sharding in MongoDB?
- “frequency”: 4,
Sharding is to split the dataset into multiple partitions. For example, if you have data from 1 to 10 million, you can store the id from 1 to 1 million as first shard, 1 million to 2 million as 2nd shard etc.
377. How replication works in MongoDB
- “frequency”: 1,
To prevent the data loss, MongoDB set replication of the nodes.
like if you have 20 shards, the 1st shard is in Virginia, MongoDB can make 2 replications (copies) of this node and put them in Ohio and California so if Virginia server is down, the other 2 replications will back up.
31. Different type of Joins
- “frequency”: 5,
Supposed you have table A 100 records, table B 50 records, they match by 20 records
- Inner/Equi Join: the match part (like: where a.id = b.ta_id), should be 20 records
- Left Join : match plus remaining of left side table, if A left join B, then return 100, if B left join A, then return 50
- Right Join, match plus remaining of right side table. A left join B = B right join A
- Full Outer Join: match plus remaining of A and B, 20 + 80 + 30 = 130
- Cross Join: Each row of A join Each row of B: 100 * 50 = 5000
- Self Join: A self Join A, treat as 2 tables, A1, A2, so A self join is like A1 join A2
33. Write a query: find the most popular product of one month
- “frequency”: 0,
Analysis:
most popular –> appear most times –> max count –> find count and order, GROUP BY always needed for aggregate function |
SELECT p.name, count() |
34. Query the average salary
定义了一个名为 Employee 的表:
Id:整数类型(Integer)Name:可变字符类型,长度为 60(varchar(60))Dept:可变字符类型,长度为 60(varchar(60))Salary:双精度浮点类型(Double)
table data:
| Id | Name | Dept | Salary |
|---|---|---|---|
| 1 | E1 | Finance | 100 |
| 2 | E2 | IT | 200.5 |
| 3 | E3 | Finance | 300.5 |
| 4 | E4 | Marketing | 150 |
| 5 | E5 | Accounting | 150.75 |
| 6 | E6 | IT | 100 |
| 7 | E7 | Finance | 75.5 |
give me a SQL 语句用于:先按部门分组查询各部门员工的平均薪资 ,然后通过 UNION ALL 将所有员工的平均薪资(以"Company" 作为标识)结果合并显示。 First, group by department to query the average salary of employees in each department, and then use UNION ALL to combine the average salary of all employees
SELECT dept, AVG(salary) |
result:
| dept | AVG(salary) |
|---|---|
| Accounting | 150.75 |
| Finance | 158.67(约) |
| IT | 150.25 |
| Marketing | 150 |
| Company | 156.26(约) |
Here is a line-by-line explanation in English of the SQL query:
SELECT dept, AVG(salary) |
SELECT dept, AVG(salary)
→ This selects two columns: the department name (dept) and the average salary of employees within each department.FROM Employee
→ The data is retrieved from theEmployeetable.GROUP BY dept
→ Groups all rows by thedeptcolumn so thatAVG(salary)is calculated per department.
UNION ALL |
- Combines the results of the first query with the results of the second query without removing duplicates (unlike
UNION, which removes duplicates). So, all rows from both queries will be included.
Select "Company", AVG(salary) |
Select "Company", AVG(salary)
→ Selects two values:- A fixed string
"Company"as the label (appears in the same column asdept) - The average salary across the entire company
- A fixed string
FROM employee
→ Uses the same table. Since there is noGROUP BY, this gives a single-row result: the overall average.
35. Is the primary key unique? Difference between the primary key and unique key
- “frequency”: 2,
Primary Key must be Unique. Unique key may not be primary key
For example, User table, UserID is primary key, it must be unique. UserEmail and SSN are also unique, but it is not primary key
38. Explain the ACID concepts
- “frequency”: 5,
ACID is the design principle for SQL relational database.
A: atomicity: means every transaction to database should be atomic, should be as a whole operation. If there is any failure inside, the whole transaction should rollback.
C: Consistency. Data should be consistent. It should not violate any rules of the database constraints.
I: Isolation, it refers to the isolation level, like READ_COMMITTED, READ_UNCOMMITED. The READ_COMMITTED level means you can only read the data that is already committed.
D: durability: when there is system crash or node failure, the data should still be available.
39. What kind of database did you use and how do you communicate with the DB
- “frequency”: 5,
Ways to communicate with database: JDBC, JPA, HIBERNATE, MYBATIS etc
355. Find the 2nd largest salary in employee table
- “frequency”: 0,
SOLUTION 1: (best for highest, 2nd highest, not good for 3rd, 4th etc, need to understand subquery)
SELECT MAX(salary) |
SOLUTION 2: (best for Kth highest. need to understand OFFSET, LIMIT)
SELECT DISTINCT salary |
的含义逐行解释如下:
SELECT DISTINCT salary
→ Selects unique (non-duplicate) salary values from theemployeetable.FROM employee
→ Data source is theemployeetable.ORDER BY salary DESC
→ Sorts all unique salaries from highest to lowest.OFFSET 1
→ Skips the first row (i.e., the highest salary).LIMIT 1
→ Takes the next one row only — which will be the second-highest salary.
✅ 整体作用:
Return the second-highest distinct salary from the employee table.
🔍 举个例子:
假设 employee 表中有这些 salary:
| salary |
|---|
| 100000 |
| 90000 |
| 90000 |
| 80000 |
执行后:
DISTINCT salary→[100000, 90000, 80000]ORDER BY DESC→[100000, 90000, 80000]OFFSET 1 LIMIT 1→ 取90000
如果你要找第 N 高的工资,只需要把 OFFSET N-1 LIMIT 1 即可。
356. Find employee whose salary is higher than its own manager (only given employee table which contains employee id and its manager id)
- “frequency”: 0,
Employee (id, name, salary, managerId)
KEY: we need to get employee salary and manager salary from same table, it is SELF JOIN, when do SELF join, we can always treat Employee as 2 tables, employee and manager
SELECT emp.name |
316. SQL how to delete duplicate rows, only keep unique rows
CREATE TABLE temp_table AS |
- “frequency”: 0,
SpringBoot
12. How do you config for multiple environments?
- “frequency”: 5,
- In spring boot, we can define different profiles for different environments, like DEV, QA/Staging, PROD etc.
- We can have
application-dev.propeties,application-staging.properties,application-prod.applications, when we run the application, we just need to set the active profile to corresponding env. - In microservice, we can also use Config Server, which we can config the different profiles and put them in server hardware or in code repository and use active profile to refer to it. The benefit is we can track the version of the files.
196. Why do you use Spring Boot? / Benefits of Spring Boot
- “frequency”: 5,
Top 1 question in spring boot.
Spring boot has many benefits, the top 4 are like:
- Embedded Server: spring boot has
Webstarter which contains the tomcat or Jetty server, you dont need to deploy the application, it is auto-deployed by one click or one command line. You just run your whole application with server together as a JAR file - Auto Configuration: Spring boot has auto configuration, as long as you put the properties there, spring boot will auto setup everything. Example, if you have Data Source entries in the application.properties file, Spring boot will try to auto connect the database for you. it’s implemented by
@SpringBootApplication, some Key Things included in this annotation@EnableAutoConfiguration@ComponentScan: will scan all beans at current level or lower level, this is why the@SpringBootApplicationis on top of a main class that is higher than all other classes, so that it can scan all beans@AutoConfiguration: will let spring boot auto configure. For example, if you have put datasource in the application.properties, spring boot will auto connect for you. If you dont want auto configuration, useExcludes=XXX.Classlike@SpringBootApplication(exclude = {DataSourceAutoConfiguration.class})to exclude that particular configuration@Configuration: means this is a configuration class.
- Dependency Management: Spring boot wraps up related dependencies into
starters, like the Web Starter contains json, rest api, mvc model, server etc. You don’t need to add them to POM.XML separately, also you dont need to worry about the version conflicts in the dependencies. - Actuator: Spring boot provides actuator which has many endpoints to tell the status of the spring boot application. Like: /info is to tell the status, /health summarizes the health status of our application. /metrics details metrics of our application. This might include generic metrics as well as custom ones.
Disadvantage:
Spring boot wrap too many things in the box, so many things are in under the cover.
Actuator细节
how to secure Actuator endpoints in a production environment
Limit exposed endpoints like this, Only expose the endpoints you absolutely need.management:
endpoints:
web:
exposure:
include: health, metrics, prometheus
or use Spring Security:http
.requestMatcher(EndpointRequest.toAnyEndpoint())
.authorizeRequests()
.anyRequest().hasRole("ADMIN");
HealthIndicator 是什么?
在 Spring Boot 中,HealthIndicator 和 MeterRegistry 是 Actuator 和 Micrometer(Spring Boot 默认的指标收集框架) 的核心机制,用于实现服务健康监控和指标采集,分别服务于:
HealthIndicator→ 自定义健康检查(用于/actuator/health)MeterRegistry→ 自定义业务/系统指标(用于/actuator/metrics)
如果你在某个项目中要同时监控系统健康状态和关键业务指标,两者通常是配合使用的。
HealthIndicator 是 Spring Boot Actuator 提供的一个接口,用于定义你自己的健康检查逻辑。
Spring Boot 默认实现了很多指标(比如数据库、Redis、Kafka、磁盘空间等),你也可以实现这个接口,来让系统健康检查涵盖你自定义的服务或依赖。
示例:
|
这个类会自动集成到 /actuator/health 的输出中,表现为:
{ |
MeterRegistry 是什么?
MeterRegistry 是 Micrometer(Spring Boot 默认的指标收集框架)提供的指标注册器,你可以通过它手动添加各种指标,如:
- 业务指标:订单数量、支付成功率等
- 技术指标:某方法调用次数、异常次数等
Spring Boot Actuator + Micrometer 会将这些指标自动暴露在 /actuator/metrics,并可以导出给 Prometheus 等系统。
示例:
|
然后你就可以通过 /actuator/metrics/orders.processed 看到数据,或者被 Prometheus 采集后用 Grafana 画图。
220. How to start a Spring Boot project?
- “frequency”: 5,
Several Steps in order:
- Go to spring initializer, fill information like Java Version, Build Tool Maven, enter project name description, Package type as Jar or War
- Choose Starters, like Web Stater, Spring Data Starter, Security Starter etc
- generate the project and download the zipfile
- Unzip and import into IDE as new project.
228. What does @SpringBootApplication mean?
- “frequency”: 5,
some Key Things included in this application
@EnableAutoConfiguration@ComponentScan: will scan all beans at current level or lower level, this is why the@SpringBootApplicationis on top of a main class that is higher than all other classes, so that it can scan all beans@AutoConfiguration: will let spring boot auto configure. For example, if you have put datasource in the application.properties, spring boot will auto connect for you. If you dont want auto configuration, useExcludes=XXX.Classlike@SpringBootApplication(exclude = {DataSourceAutoConfiguration.class})to exclude that particular configuration@Configuration: means this is a configuration class.
234. For Spring Boot, how do I use another server such as WebLogic instead of the embedded Tomcat server?
- “frequency”: 4,
Some configurations needed:
- add Exclusions in POM.XML to exclude the embedded tomcat and jetty server
- need to add JNDI in the application.properteis for the new server (such as weblogic)
- the main class needs to extend the SpringBootServletInitializer
- Change package in POM.XML from JAR to WAR.
350. Difference between Spring boot and Spring
- “frequency”: 0,
- Spring boot use starter to manager dependencies, like Web Starter has MVC, REST, JSON, TOMCAT, IOC etc all included in one web starter. You dont need to worry about dependency conflicts.
- Spring boot has tomcat in web starter by default, so you dont need to package and deploy to tomcat. You can just run it directly or package it as JAR file and run it everywhere.
- Spring boot put everything in annotation by default, you dont need to write a lot code as in Spring.
- Spring boot add auto configuration, like if you put datasource in application.properties file, it will auto connect for you. You dont need to write the java connection code.
- Spring boot provide actuator which you can use to measure the metrics of the applications, like /info, /heath etc to tell the metrics, it is very useful in microservice environments.
447. How to do cache in spring boot and how to refresh the cache
Enable Caching
First, activate Spring’s caching mechanism in your config class:
|
Define a Cacheable Method
Use @Cacheable to cache a method’s result. Example:
|
valueis the name of the cache (can be mapped to a specific backend like Redis, EhCache, etc.)keydetermines how the cache is indexed (SpEL expression)
Cache Refresh Options
1. Manual Refresh (@CachePut)
(value = "products", key = "#product.id") |
- Updates the cache with the new value returned by the method.
- Doesn’t skip method execution (unlike
@Cacheable).
2. Cache Invalidation (@CacheEvict)
(value = "products", key = "#id") |
- Removes the cache entry explicitly.
- Use
allEntries = trueto wipe the whole cache region:
(value = "products", allEntries = true) |
3. Scheduled Refresh (via @Scheduled)
Use this when you want to auto-refresh cache periodically.
(fixedRate = 3600000) // every hour |
Make sure you enable scheduling:
Backing Cache Store
By default, Spring Boot uses a simple in-memory cache via ConcurrentMapCacheManager. For production, plug in:
- Redis (
spring-boot-starter-data-redis) - Caffeine
- EhCache
- Hazelcast
Example (Redis):
spring.cache.type=redis |
Redis auto-integrates with @Cacheable and supports TTL and eviction policies.
Summary
| Annotation | Purpose |
|---|---|
@Cacheable |
Read from cache, populate if missing |
@CachePut |
Update cache forcibly |
@CacheEvict |
Remove cache entry or all entries |
@Scheduled |
Automate refresh by clearing entries |
Use @Cacheable for reads, @CachePut on writes/updates, and @CacheEvict to invalidate. Use Redis or Caffeine for production-grade caching.
SpringCore
174. Spring Annotation you used in your project?
- “frequency”: 5,
@Controller, @RestController, @RequsetMapping @GetMapping @PutMapping @PostMapping @DeleteMapping
@PathVariable @RequestParam
@Autowired, @Qualifier
@Service @Repository @Componenet
176. What is IoC/Dependency Injection?
- “frequency”: 5,
That is the most basic module of spring. Without spring, if you want to use another bean in one class, you have to create instance by yourself by calling the constructor. But with spring, you dont need to do that, you just use @component or @bean and other spring annotations to let spring manage the beans for you, so spring has a bucket called bean factory, it manages all the beans there for you, if you need to inject a bean, you just use @autowired, spring will find the instance and wire it for you. So you are giving the control of creating instance to spring, that is why it is also called inversion of control.
177. What is AOP and how do you implement AOP in the project?
- “frequency”: 3,
AOP - Aspect oriented programming, is to interfere with main application execution.
Aspect: @Aspect is to mark a class as AOP class which contains AOP annotations and methods
Pointcut: an expression to find all the main application package or methods to apply AOP. like execution(* com.example.CalculatorService.*(..)) means find all methods in CalculatorService package.
Advise: when to apply the AOP logic, @before, @after @around @afterThrowing etc.
Purpose of AOP:
- 1)exception handling
- 2) logging
180. Spring bean annotation, bean life cycle and bean scope
- “frequency”: 5,
Annotations:
- @Component @Bean @Controlelr @Service @Configuration etc
Bean lifecycle
- Bean instantiated –> dependency injected –> init() –> custom operation –> destory()
Bean Scope:
- Singleton (DEFAULT): only one instance per whole applcation/container
- Prototype: create a new instance whenever you need to INJECT this bean
- session: one instance per user session
- request: one instance per user request-response cycle.
EXTRA: Does spring has thread scope? – NO: if you need, create by yourself.
184. Spring Bean scope and explain the request scope
- “frequency”: 5,
Singleton: DEFAULT scope, only one instance per application.
Prototype: create new instance whenever you use @Autowired to inject
Request: create new instance per user request response cycle
Session: create one new instance per one user session
186. Different ways of DI
- “frequency”: 4,
Constructor based, Setter based, Field based
Assume you have Bean A and Bean B. A depends on B and B also depends on A.
Constructor based: when you start spring application, spring will create bean and inject the dependencies. So in this case, when create Bean A, it will need Bean B to inject, so it will create Bean B, and then it finds Bean B will need Bean A. So Bean A and Bean B are waiting for each other. It will throw BeanCurrentlyInCreation exception.
Setter based: the dependency is only injected when it is used. Spring will first create Bean A and Bean B, but will not inject to each other until B is used in methods inside A. so there will be no exceptions
Field Based: it is based on java reflection, so it will not throw exception either.
193. When there is circular dependency, use which type of Injection? / Setter based Injection vs. Constructor based
- “frequency”: 4,
Circular Dependency: when 2 beans are dependent for each other. Bean A and B, A is injected into B and B is also injected into A.
Constructor based: the beans are injected when initialized. So when you create bean A, it will try to create bean B so it can be injected, but while it tries to create bean B, it needs bean A. So using constructor based, it will throw BeanCurrentlyInCreationException.
Setter Based: Dependencies are only injected when they are used, they are not injected when spring initialize the ApplicationContext. So this will not throw the exception.
218. How to inject bean when there are two beans with same type?
- “frequency”: 5,
Use @Qualifier. Like if you have an interface and 2 children, you can use @Qualifier to decide which one to inject
365. How does spring inject singleton bean into prototype bean?
- “frequency”: 4,
Essential point
Injecting a singleton‑scoped bean into a prototype‑scoped bean is completely straightforward. Spring just treats it like any other dependency: when it creates each new prototype instance it fetches (or lazily creates) the singleton once and wires that same reference in. No extra factory, proxy, or ObjectProvider is needed.
Why it “just works”
| Step | What Spring does |
|---|---|
| 1 | The container already holds (or can eagerly create) exactly one instance of SingletonBean. |
| 2 | Each time you request the prototype bean, Spring constructs a fresh PrototypeBean. |
| 3 | During construction, the container resolves constructor/field parameters. Seeing a dependency on SingletonBean, it re‑uses the existing singleton instance. |
| 4 | The new prototype instance now holds a reference to the singleton. Every prototype object points to the same singleton, which is normally what you want. |
Since there is no lifecycle mismatch—the singleton outlives every prototype—no special wiring tricks are required.
Minimal working example
|
Each call to context.getBean(PrototypeWorker.class) returns a fresh PrototypeWorker, but the SingletonService inside is always the same object.
Common pitfall to avoid
Confusion usually arises in the opposite direction—injecting a prototype into a singleton—because that really does need an ObjectFactory, Provider, or scoped proxy. For your case (singleton ➜ prototype) stick to normal injection; anything heavier is over‑engineering.
Practical recommendation
- Use constructor injection (as shown) for immutability and testability.
- Leave the singleton scope implicit unless you need lazy initialization; avoid unnecessary annotations.
- Document the scope of the prototype bean so future maintainers understand why they see many instances pointing to one shared dependency.
Spring already handles the lifecycle alignment for you, so keep the wiring simple and focus on the business logic.
449. What to lazy loading a spring bean
Lazy - loading a Spring bean means that the bean is instantiated only when it’s first needed, rather than during the application context startup.
How to achieve it:
- XML configuration:
- In traditional XML - based Spring configuration, you can use the
lazy - initattribute. For example:<bean lazy - init="true"/>
- In traditional XML - based Spring configuration, you can use the
Java - based configuration:
- In Java - based configuration classes (using
@Configuration), you can use the@Lazyannotation. Suppose you have a configuration class like this:
import org.springframework.context.annotation.Bean;
import org.springframework.context.annotation.Configuration;
import org.springframework.context.annotation.Lazy;
public class AppConfig {
public MyBeanClass myBean() {
return new MyBeanClass();
}
}
The
MyBeanClassbean (represented by themyBeanmethod) will be lazily loaded.
- In Java - based configuration classes (using
The main advantage of lazy - loading is that it can speed up the application startup time, especially when you have a lot of beans and not all of them are needed immediately. However, the first access to a lazy - loaded bean may take a bit longer because the bean needs to be instantiated and initialized at that time.,
319. How to configure multiple database using JPA
- “frequency”: 4,
Each database is connected by its own datasource(driver, url, username, password). We need to list them in application.properties and use them to create different dataSource beans, so JPA can use these beans.
spring.datasource |
SpringRest
178. Http status code you ever met
- “frequency”: 5,
- 2XX: success
- 200: Success
- 201: Resource created successfully
- 202: Accepted: the request is accepted, but not processed yet.
- 204: No Content: request is success, nothing to return
- 3XX: the requested resources have been moved, client needs to do a redirect.
- 301: resource is permanently moved.
- 302: resource is not found - temporary moved to another location
- 308: permanently redirected to a new location
- 4XX: client side error
- 400: Bad Request
- 401: Unauthorized
- 403: Forbidden
- 404: Not found
- 405: Method not Allowed
- 5XX: server side error
- 500: Internal server error
- 502: Bad Gateway
- 503: Service Unavailable
- 504: Gateway timeout
187. Explain MVC and the order of each components
- “frequency”: 5,
Request –> security –> controller –> service –> repository –> response |
- Security: handles request authentication and authorization
- controller: handles request, contains the mapping, endpoint, methods, return type etc.
- service: for business logic
- repository: crud operation with database tables
197. Different types of request mapping/rest api/http methods
- “frequency”: 5,
CRUD METHODS: C - POST, R - GET, U - PUT, D - DELETE
PUT vs POST:
PUTis to update, it is idempotent (means, if you do PUT 2 times with same data, you get the same results)POSTis to create new object, if you do POST 2 times, you create 2 objects, so it is not idempotent.
Can you write create object or update object in GET request?
YES. the methods are contracts in REST api, it is just to limit how you call the rest api, the detailed logic has to be implemented by yourself, so you can write any logic you want, but it is not good idea to write post or put logic inside get method.
226. How to handle controller exceptions? How spring handles exception?
- “frequency”: 5,
@ExceptionHandler can handle exceptions at controller level. @ControllerAdvice + @ExceptionHandler together can handle exceptions in all exceptions.
228. create a Transactional service
|
229. How do you create a controller?
- “frequency”: 5,
|
232. What is difference between path variable and query param?
- “frequency”: 4,
- PathVariable is a MUST-HAVE parameter in URL.
- Query Param is more like for optional parameters.
236. What will happen after clicking the URL?
- “frequency”: 4,
How is application deployed?
For example, when you deploy amazon application to amazon.com, the application is deployed on a server with a static URL, that static URL is mapped to the domain name amazon.com, the mapping is managed by DNS(Domain Name System), so when someone click domain amazon.com, the DNS will find mapping and redirect to the original static URL.
What happens after clicking a URL?
- browser will parse the URL, find protocol (http or https), domain name, path, query parameter etc.
- browser will call to check DNS to find the IP address for the application for the URL domain.
- browser will attempt to visit the original URL and build the connection
- The request will goes through security layer, and then to controller, service, repository and then to database
- the data comes back as a response will go back to the browser
- the browser will render the view
201. How does JWT work?
- “frequency”: 5,
JWT is to a tool that you don’t need to keep login with your username and password.
JWT token has 3 parts, the header, payload body and signature. The header contains the type of the token and the algorithms such as SHA256. The payload body contains the user data like username and userrole etc. The signature is to a string used to verify the payload data.
Flow:
- User login with username and password, the backend will validate and create a JWT token.
- The token is sent back to frontend and stored in the Cookie.
- Subsequent requests come with the cookie and the JWT token is passed in the request header.
- The token will be validated to check if user is authenticated.
- The token expiration time can be extended.
You dont have to store the token in database, but if you want to persist it or set the expiration time, you can store it in the database.
211. Have you used security? how do you protect your rest api? how do you protect your application?
- “frequency”: 5,
What: We use spring security.
How: We override the spring framework WebSecurityConfigureAdaptor and its many configure method. We can use JdbcAuthentication, InMemoryAuthentication etc and Store the user credentials in the UserDetails object. We can also use BCrypt to encode the password and JWT token to do validations. We can use use antMatcher to let certain URLs only be accessed by certain User Roles.
Ways for authentication and Authorization:
- UserNamePassword authentication: When user fill username password in frontend, we can encode their password and validate with database or check if credentials match in UserDetails object.
- JWT token, if the user is validated, we can use JWT token to validate the subsequent requests so user won’t need to to enter credentials anymore for a validate token period. The JWT token is stored in cookie and will be passed along every request. Each token can have an expiration time and can be extended. The token does not have to be saved to database.
- Oauth2: we can also use Oauth2 to do authorization, it is 3rd part authorization, just like
login with google, :login with facebooketc. You first request 3rd party to get authentication token and then use that authentication token to get authorization access. - Asymmetric Key pair, also called public key and private key. Many online portal uses it, just like AWS SDK.
- Remember-Me feature, it is just to let user choose to let application remember the credentials and store the settings in the user cookie
- Authorization: can use AntMatcher to do authorization for certain roles.